
Glimpses
Snapshots of our lives
September 6, 2011
Scary stuff
Holy moly, I just spent almost two hours at Lowes! There is just so much wonderful stuff to see that makes me dream about endless possibilities that are restricted by a tight budget, which I already blew tonight. No more spendings for the the rest of September. But the supplies I got should last for a good while and for a bunch of projects that are lined up.
Originally I thought that the dining room is gonna be the next candidate for a makeover. It still had that somewhat tolerable wallpaper, but stood there kind of bland and blah in the middle of our house ad wouldn’t quite fit in with the kitchen and living room. So within only 1.5 hours I was able to pull off an unexpectedly smooth wall paper removal, and was left staring at even more boring walls. What to do, what to do .. let’s ask Pinterest. And there I found this fine little piece of inspiration:

Board and Batten is what it’s called. Never heard of it before, but I’ll take it. Supposedly it is a very simple project that involves only cutting some boards and nailing them to the wall. But then again, it looks like a lot of board cutting and nailing and caulking corners and painting. So I got a little intimidated by the whole thing. Actually quite a bit intimidated. A lot. Scared almost. But I still want it.
To escape this scary room, I quickly moved on to another smaller project. The foyer. While this is the only room where we totally love the wall color and coat hooks were already installed, at first glance it doesn’t look like it needs a lot of work.
But then look a little closer:
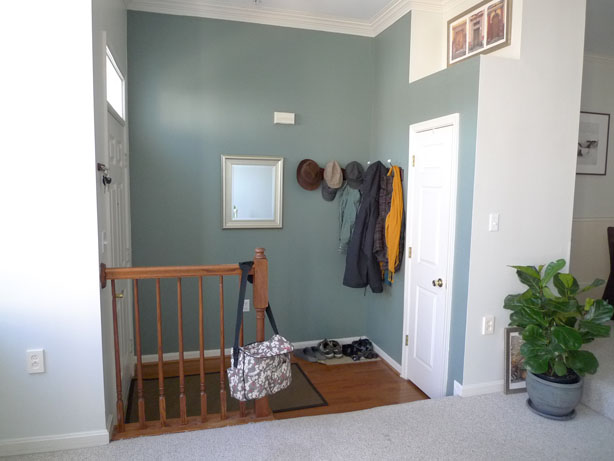
1st problem: Bags are hanging out at the banister, shoes pile up on the floor. Solution: Add storage for bags and shoes. Simple as that.
2nd problem: The banister is ugly. Too oaky, to traditional, and it kind of feels like you walk straight into it when coming into the house. Unfortunately right now it is doing a good job keeping Milo and his toys from falling down the step, so it will have to stay until there are no more little toddlers toddling around. Solution: Paint it white to blend in with the other trim.
3rd problem: The trim isn’t even white. Solution: Just bought a heavy gallon full of ultra white semi-gloss paint.
4th problem: There is an unsightly door bell box hanging in the middle of the wall. Solution: Not sure. What do you suggest?
5th problem: The wall art above the closet is very generic. The only thing it has going for it is that it fits perfectly shape wise. Solution: Change the picture and add something 3dimensional.
6th problem: The ceiling light is not in the photo. But trust me, it is not worth it taking another photo. Solution: Maybe in the long run switch it out for a nice (possibly DIYed) pendant light that ties in the high ceiling a little better.
That reminds me – it’s almost Halloween. Time to get some fall craft going and breaking out some scary moves myself. How about you guys? In the mood for some easy foyer fixing upping? What ideas do you like to make this practical room a little more pretty?
August 31, 2011
Ready, guests, come!
Wow, this was one of the longest drag for a room makeover so far. An estimated two months later the guest bedroom is finally done. For now. Of course there is gonna be more stuff and deco things added over time, but at least it has all practically needed items in it and looks cozy enough. I think this is my new requirement for a room makeover to be deemed completed. We did splurge on the bed. Got a new mattress from Amazon for the fraction of the price of a store bought mattress (Sleep Innovations memory foam mattress, so comfy that Lincoln wants to sleep over in the other room now. Wish I had gotten this for our own bed 3 years ago.) and a new bed from Ikea because we just couldn’t find a nice one on Craigslist and trust me, I’ve been checking every single day for two months. So at least for the price we got something completely bed bug free and hope that our guests will always want to return to this nice bed.
Here are the details on the makeover:
 Darn, I just noticed that the pattern of the curtain is upside down. Oh well. I am so happy that I found this fabric at Joann’s. It matches the yellow in the duvet cover perfectly and brings some sunny elegance to the room. Got it with a 50% off coupon for $20 and made the curtains in two evenings. (One evening equals two hours in Nicola currency).
Here is a vintage suitcase for $2 from a yard sale that will one day get legs and become a real night stand. A cute lamp for $5 from Goodwill. And some printed travel wisdom in a white painted $3 IKEA frame that had been waiting for its use for 3 years.
 For the bed we had to reuse the old duvet cover because it just wasn’t in the budget to get a new one. I know, this one is very colorful and kind of dominating the room, but just imagine how changing it up one day will be like another entire room makeover in one step.
To fill all the empty space above the rather low IKEA Malm bed (we chose this bed because we did not want to overpower the small room with a huge bed, we had already gotten a free Malm dresser, and because it fit in our car), I created some bigger sized wall art. Had some old canvasses on hand, painted them white, folded some origami boats out of left over maps and hot glued them on. Done.
From some leftover curtain fabric I made the two small pillow covers to replace funky orange ones that we already had.
 On the opposite side of the bed I framed some postcards and envelopes from all over the world in some more super old IKEA frames that I bought in a picture frame obsession 3 years ago and never used. They are the cheap ones that come in 3 packs. They are plain wood and can easily be painted or embellished to match any decor.
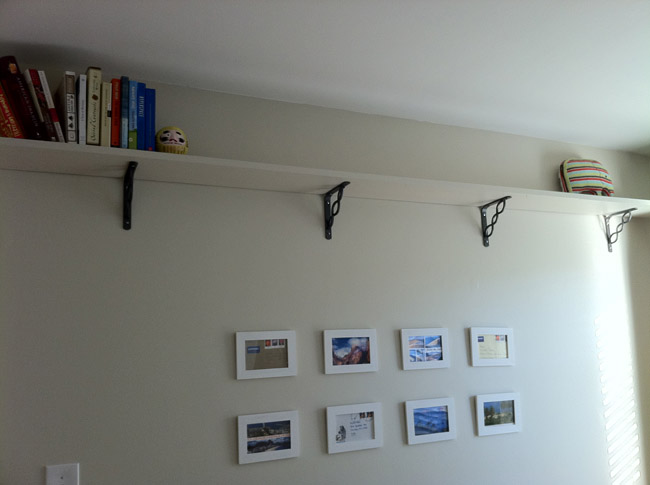
On the shelves that I have no problem with in this room (as opposed to Milo’s room) I arranged some random items that we had and that somewhat belong in a guest room: travel guides, some novels for entertainment on all those long vacation days, a hand-sewn elephant that reminds me that I still want to go to Africa one day, a miniature VW van for dreaming of road trips, etc.
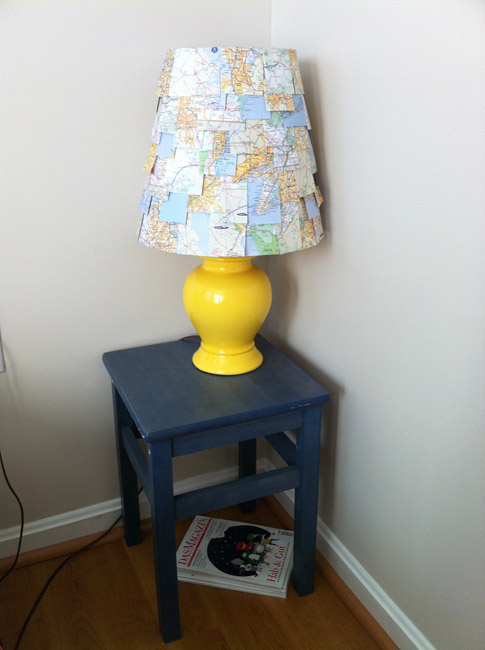 And then we have the previously introduced map lamp. I think all the materials for it were $4.
The little stool/side table thingy is one of those items that are a classic bargain: When I saw them at a yard sale they were super cheap (I think it was $2 for two of them an my mom paid for it because I had conveniently forgotten my cash at home) and seemed somewhat practical, so I got them even though I had no idea what exactly they could be used for. Now one of them is serving as a makeshift nightstand and the other one is holding a fan in Milo’s room. They are also really practical to get up to the slightly too high shelves.
If the bed hadn’t busted our budget, this would have been a really budget friendly room makeover. How do you like it? Is it too travel thematic?
So there you have it, another room done and here is a little hint as to what is next: one of the rooms in a house where you don’t want light colored carpeting.
August 23, 2011
The huuuuge 1!
August 12, 2011. The day of Milo’s first birthday ever! It started with Milo waking up screaming at 5 AM and then me melting down because I just couldn’t take those 5 AM wake times anymore. Afterwards we both went back to bed and at least Milo was happy when he woke up the second time. I think this is the only memory I have from my little one’s actual birthday.
But luckily we got another chance the next day. We both got plenty of sleep and had a great party. The weather was a little unstable, but who cares. We just moved the whole shebang indoors. Yay for our house which fits approximately 15 kids and 15 adults and still has some room for everyone to run around like crazy. Milo had a blast and it seemed like everyone else had as well. Thanks everyone for coming and bringing so much joy to our little boy’s life! Milo loves all the toys he got and every morning he has a hard time deciding what to play with first. Peace and Love, The Trans.


August 11, 2011
What The Heck Is Mod Podge?!!
Never heard of it before until I found some awesome craft ideas that require to use it. Since I have about three such projects on my to do list, I went out and bought it. I still don’t have a clue what it is exactly, mostly because we don’t have a similar thing in Germany. Anything that I cannot compare to something familiar I grew up with automatically falls into the category of unexplainable weirdness. Anyway, it glues and it seals preferably paper or fabric onto other surfaces. And that’s all I need to know for now. So I went ahead and did a little mod podge project in half an hour of my evening.
Here is why:

And here is how:
1. Save some empty baby formula and coffee containers
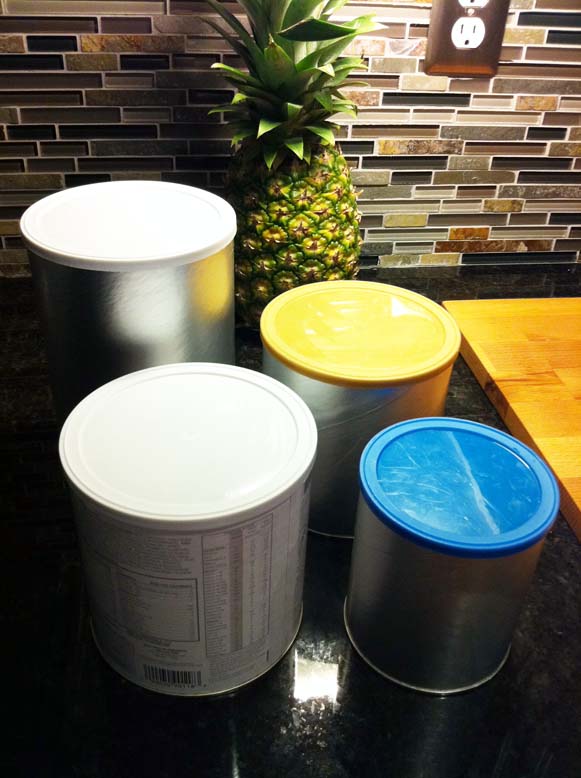
2. Cut some pretty scrapbook paper of your choice into strips of the height of the can from the top metal rim to the bottom metal rim. I went with this modern floral pattern to stay within the neutral colors of the kitchen, but lighten things up a little.

3. Apply mod podge with a (sponge) brush to the paper or to the paper AND the container. Do not apply it only to the container as the paper will start wrinkling once it starts to soak up the podge from the can. This is the part where you can learn from my mistakes.
4. Glue the first couple of inches of one end of the paper onto the can and make sure that it aligns parallel with the top and bottom rim. Then wrap it tightly around the rest of the can and smooth it out by stroking with your hands. (Sorry, no pictures for these two steps as I needed my hands and they got all moddy).
5. If the diameter of the can is more than a foot, you will need another strip of paper to fill the gap. If you want to be perfectionistic about it, you can try to match the pattern, but I chose imperfection and just cut a random piece which will sit at the back of the container and stare at nothing but the wall.

6. Apply an even layer of mister moddy podgy over the paper surface. Let it dry and apply another one. And another one, if you want to be extra safe.
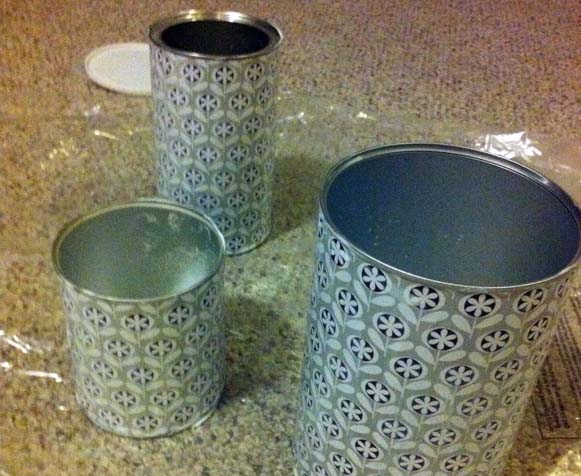
7. If you keep the containers in a splashy area, you can probably go ahead and finish them off with some poly spray. This is on your own risk though. I haven’t tried this yet, but I assume that the awesome podge seals the paper sufficiently so that the poly wont harm it.
All done!

August 11, 2011
More than words
So, recently I made this framed piece of wisdom to hang over the suitcase nightstand in the guest bedroom. I have never really been into hanging words onto walls just because they are so literal and usually I find pictures more subtle in expressing what I want to say. But then again, words are way more specific and why not contribute a little bit to keep the lost art of reading alive.
When it comes to creating wall art, I don’t like my handwriting enough nor do I trust the steadiness of my hand. Therefore I gladly take on the help of internet and computer for matters like these. I guess I don’t have to go too much into detail about how to print on paper, but I don’t want to miss this opportunity to share with you one of my favorite internet pages besides Pinterest and Kuler when it comes to design stuff: Dafont! You can download thousands of funky, pretty, exotic, or stylish fonts for free and will for sure find the right “handwriting” for your project. The one I used for my travel words is called FFF Tusj. Here are just a few samples of what else is out there:

August 2, 2011
Pinterest Challenge
Some say that everyone needs their addiction. So far I have proven those people pretty wrong. Always being the independent control-freak-self addiction spells danger to me. The mere thought of needing a certain substance or thing in order to get on with the day freaks me out. This rather radical attitude has gotten me through life without ever feeling the need to try cigarettes, coffee, or other evil things I don’t even dare to mention. Until I met Pinterest. As soon as I wake up there are already great DIY ideas waiting for me and I won’t sleep until I make sure that I haven’t missed a single inspiration that day. It’s dangerous. Seriously. Or like one of those funny pins says:

But, here is where my built-in alarm starts ringing and the control center in the front of my brain kicks up gears. In one of my strong moments I made a rule for the addict part of me: No more pinning unless I actually implement one of the DIY ideas in real life. At least one per month. Or every 20 pins. The yarn wreath was the first one. And then these crazy crafty girls over from younghouselove and associates started a Pinterest challenge last week. The idea was to make one pinned idea become reality and then come back today with the result. Well, it just so happened that I was in the middle of crafting a map lamp for the guest bedroom when the challenge started, so here we go:

Unfortunately I was already half way through the project when the challenge started (and excuse the greenish light from the window shades), so there is no real good before picture of the lamp. But you can picture it: it was a regular lamp. Yellow porcelain base and white shade. Nothing crazy. Got it for approximately $3 at a yard sale.
I also got maps of the entire USA at Goodwill for $1. They looked very unused and useful so I almost felt sorry to cut them up, but they were from 1996 and probably not as up to date as google maps on my phone. Therefore they were cut into little squares and rectangles of slightly different sizes. I wanted them to not look completely uniform, but somewhat related to each other. Then I started glueing them onto the lamp shade in a carefully planned irregular pattern starting on the bottom and working my way up and around. I made sure to cover the tops of the layers below so that you cant see where they start. Kind of like this:

The finished product has most of Maryland, some Florida, Colorado, and DC on it. All spread out to be found and explored by our guests. Sorry to not have a better picture on hand at the moment. I took it in a rush before Milo came home. Will replace this one tomorrow. Welcome home map lamp:

And this was the inspiration pin:

Of course the original looks much more artsy and whimsical. My little yellow lamp has its own Nicola twist to it – a little more organized and clean. Like it?
July 31, 2011
Home Decor on a Budget
Let’s face it: Home improvements cost money. Sad , but true. Also true is that I have a very limited budget to spend every month. But no need to get all teary-eyed – just one more reason to get creative. Here is how to make home improvements happening on a tight budget:
1. Set a budget! Duhh! That’s kind of given. My “budget” is usually pretty general: Get everything for as cheap as possible. Cannot exceed $100 a month on total expenses. Other folks probably swear by setting a specific cost for a specific project, but in reality you never know how much things are gonna cost, or what additional materials you need, etc. So I am just trying to accomplish as much as possible on my monthly budget and anything that exceeds it has to be delayed until later. Absolutely necessary big ticket items (like a mattress for the guest bedroom) will go on the credit card and have to be paid off within 2 months.
2. Do it yourself! If only it was that easy. Have I mentioned before that in addition to little money I also have very limited amounts of time left over? I know, the most logical approach to life would be to work hard, make lots of money, and then spend it on finished products and hire contractors to do the work. Or the other way around: Work little, have more time, do everything yourself. Well, I guess I got the best (or worst) of both worlds. Here is how I squeeze home improvements in my weekly routine: (more…)