
By: Nicola
October 12, 2011
Fine Dining
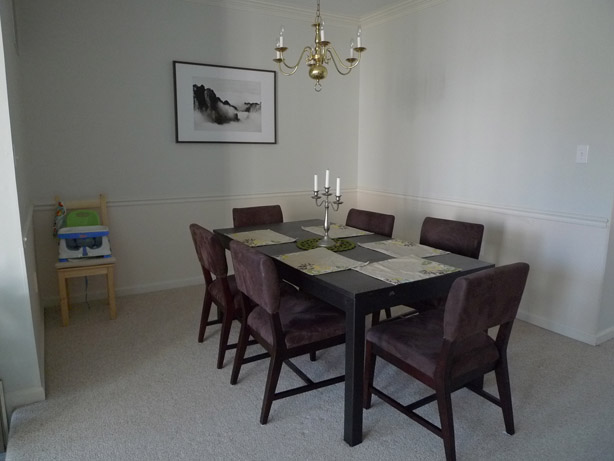
Another makeover is deemed complete. Of course art work is still missing, but those things take time. For now we proudly present the new and improved dining room:

You already learned about our difficult choice of wall paint color here, so let’s move on to some other brand new details. The second place in the category best color improvement goes to … the chandelier.

It went from 90s-brass to modern white in just a few coats of glossy spray paint. Well, of course the guy had to be taken down and primed first, but other than that it was a lot easier than expected. I got primer and paint for not even $15 and spent about 1 hour intermittently spraying outside. So, a lot of bang for you buck and effort. Definitely recommendable to anyone who is currently enduring the outdated view of a brassy chandelier and doesn’t want to spend hundreds on a new one. To spare you all the details of how to spray-paint a chandelier, I’m just gonna link you straight through to my inspirationers over at younghouselove. And this is what my setup outside looked like:

While I was at it, I also sprayed some old frames and candle holders into matching accessories.

Then of course we have the fresh coat of semi-gloss ultra white paint on the trim. While applying it I noticed the unusually bad coverage of the thin paint right before I noticed that I had accidentally bought No-VOC (you know, without the majority of the toxins) paint. That was about the same time when I noticed that this paint was pleasantly unsmelly and I immediately felt so much better breathing in deeply that I might have become a new advocate of this paint. It’s not even that much more expensive anymore than regular paint and much better to use in a household with a young child. Not that I don’t care about my own health, but you know, just watching out for my kid first. The only downside is that it does require one additional coat. In the course of painting the trim I also came up with this nifty trick to reduce cleanup time:

Luckily Martha Stewart had already thought of the same idea, so I didn’t even have to take a photo or write up a lenghty description of a simple thing. More space for other good news.
Or the bad ones first. After the whole paint job was done, I drifted into somewhat of a conceptual crisis. While I love the new color of the dining room and also still deeply care for the green kitchen and the teal foyer and the golden curtains, it suddenly was becoming a little bit too much uncoordinated color. Even for me, the color addict. Too much of a good thing can get too much if it is all just thrown together without concept.
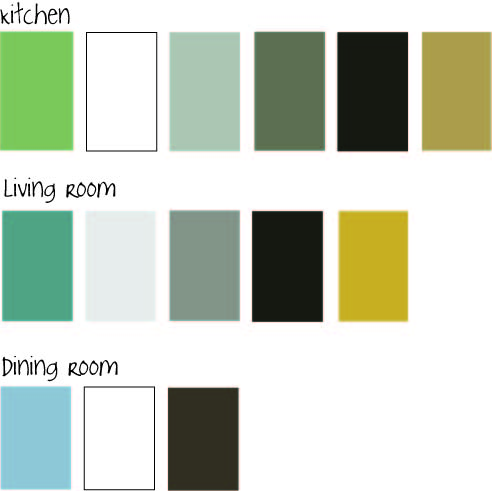
I started to learn my lesson that where rooms are well connected like this, you can’t just color-conceptualize room by room. You have to view the entire level as one.
Usually what I do to come up with a color concept is to take an item that I love (could be a blanket, a piece of fabric, a piece of art, etc) and take the colors from there. Basically taking over the color concept somebody else has already won me over with. Kind of like these people over at design seeds do it. This way you know upfront that everything is gonna go well together.
Well, it was kind of too late for that approach. So what now? How about setting the table for a nice dinner and photo shooting?
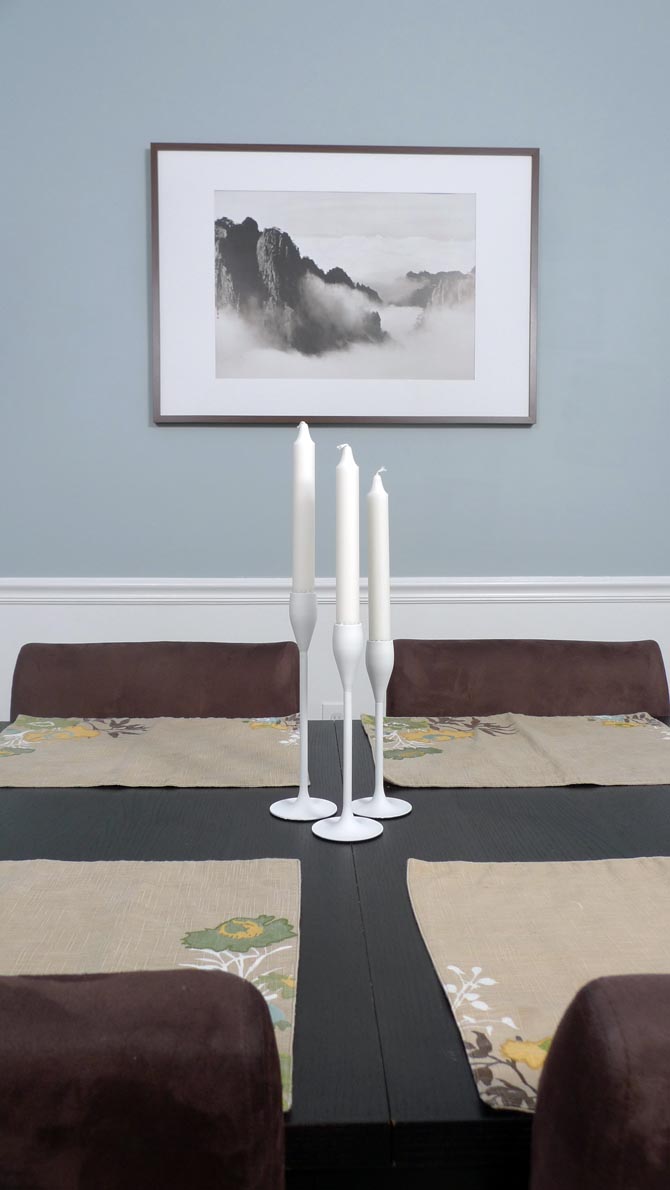
Yep, you got it. When I was pulling out those place mats (that I got a few months ago at Target on clearance for $2 a piece and love so much that I have been protecting them from spills by hiding in the cabinet) it suddenly all started to make sense:

The green from the kitchen, the blue from the dining room, the brown of the furniture, the golden yellow of the curtains, the white trim – all of them tied together nicely in a nature-themed piece of fabric. The only guy not present is the teal of the foyer, so we all know it will have to be painted over. But that’s a whole other story. For now, let’s cheers and have some good home-cooked meals. For example like tonight’s spaghetti squash. Hmmm….
October 9, 2011
The Odyssey
So, there has been some action going on in our living/dining/foyer area lately. You know, just a few little splashes of paint here and there. What started as a dining room makeover and then turned into a foyer makeover has become a whole first floor minus the kitchen makeover. There are so many things to do here that my scatter brain just happily jumps from one project to the next without any clear focus. Whatever feels right is next on the list. Right now I am trying to get all the painting projects done before winter comes and takes away the ability to air out the house without freezing to death.
Updates from the foyer are coming as soon as I finish painting the trim and front door white. But in the meantime let’s switch back to the dining room.
Remember how I got all scared by the boards and batten idea that I would love for the dining room walls? Well, I finally found a good excuse to delay this project indefinitely until we put new floors in our house one day in the distant future. When we install new floors we will have to put up new baseboard anyway, so why go through the trouble installing all these boards now? Exactly! So for now we are keeping the chair rail, will paint the bottom half white, and are adding some color to the top half. And here is where it becomes tricky.
The foyer was already painted a muted dark teal that we love and want to keep. The kitchen is sporting a muted olive green. So the dining room that sits in between those to rooms has to match both colors. So far it has accomplished that by wearing the same neutral light grey as our living room. But we wanted it to stand out as a separate room a little more. However, since the rooms are all well connected, they still have to connect visually somehow. But no more green! Phew, what to do? We were thinking somewhere in the blueish area, muted of course and maybe with a tiny hint of purple in it. Like the clouds on a rainy day. And the sky of the painting in our living room. Read from left – foyer, dining room, kitchen:

So we picked up a bunch of paint chips in that color range and after looking at them for a few weeks in all different lighting situations, we narrowed it down to just a few candidates.

The final winner was “Misty Morning Dew” from Valspar. It had that perfect balance between blue, grey, and purple. Or so it seemed. Because once that baby went up on the entire wall it looked purrrrple like no tomorrow. I can’t say that we didn’t try to let it grow on us or even fall in love with it. But it just didn’t happen. Can’t force love where there is none. The purple was just a tiny bit too funky for us quiet people. So it had to go. (Notice how we turned the table 90 degrees? Not completely decided on the orientation yet, but it definitely opens up a lot more space in the center of the house. The downside is that you have to squeeze your way a bit to the chairs behind the table.)

Well, we didn’t quite feel like buying another bucket of paint either, so I consulted the 15+ paint leftovers in the basement for a solution. Did you know that paint is still in usable condition after 3 years? The only problem is that the can starts to rust and crumble into the paint at some point. Anyway, these were my candidates for a happy mixer event: A pale green, a medium muted teal, and our unloved periwinkle grey.

Together they made this beautiful ice-blue that is now just waiting for the bottom half and the trim to put on a crisp white. More/better pictures to come soon after the trim is finished.

Fits in a little better with the other two colors anyway:

What do you think? Improvement or not? Would you have been daring enough to go with the purplish color? Have you ever experienced a color looking completely different on the wall than on the sample? What did you do about it? Live with it or paint it over?
September 27, 2011
Wall Art
In my eyes walls are a piece of art in themselves. How they stand up straight, hold the house together, keep us warm in winter, and can be painted in the prettiest colors of the rainbow. But they tend to shine even more when they are dressed with some beautiful pieces of wall art. Things that give the eye a focal point, that make a plain wall seem more cozy and less structural, things that bring the whole room together and to life. May it be a mural, pictures, photos, wallpaper, or random items. Here are some of my favorite pinteresting ideas for wall art:
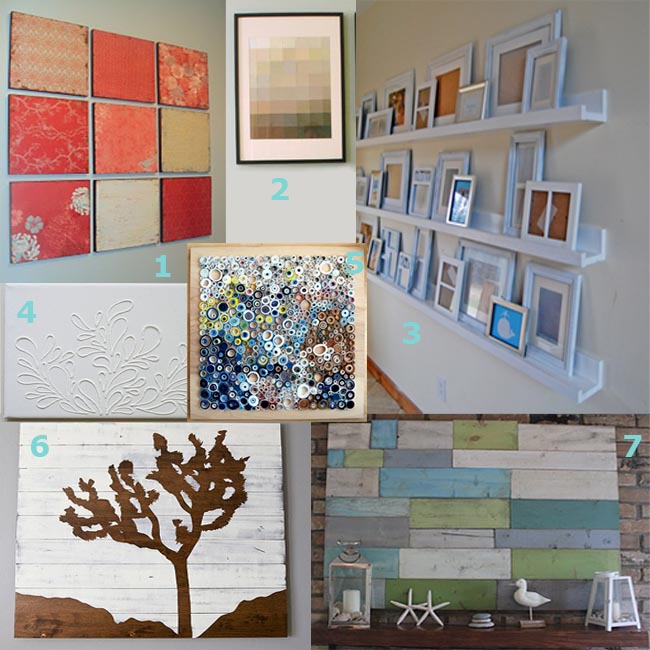
1. Glue pretty scrapbook paper on 1x1foot MDF boards.
2. Arrange paint chips in a gradient pattern. Looks like a pixelated photo.
3. Collect a bunch of white frames with randomly collected art on wall ledges.
4. Use fluffy paint on canvas and then spray-paint the whole thing white.
5. Roll up strips of magazine paper and glue on a wood board. Something for people who need to keep their fingers busy.
6. Tape off a pattern or design on woad boards, paint over it, and then remove the tape.
7. Screw a bunch of withered boards to each other and stain them with a thin coat of any leftover paint.
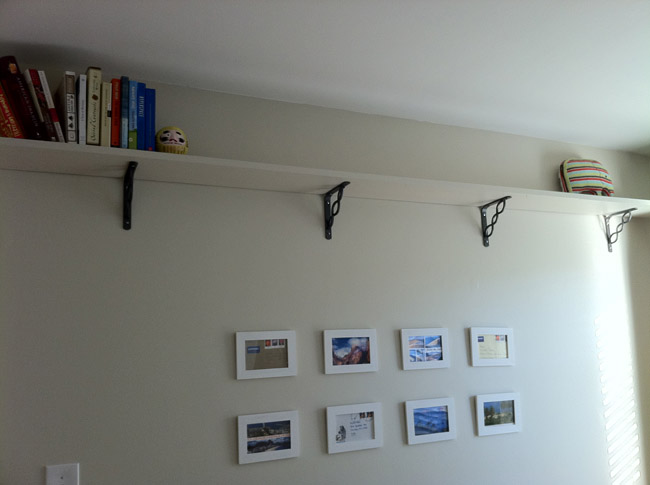
And then there is this secret I discovered just recently: Pictures look better if they are hung to the wall in groups with some empty wall around them rather than spreading them all over the entire wall. Ideally they should all be in frames of the same color group, texture, or style and then arranged in a seemingly random but coordinated way:


Doesn’t look too complicated, right? Personally, I believe that hanging pictures on the wall is the first step to making a house a home and yet sometimes it is the last thing we get to. I have learned my lesson from the past when I would finally hang picture son the wall and then moving out again shortly after. So, let’s get to it. Shall we?
Please feel free to share any wall dressings that you have hung or made recently. Do you prefer photos, paintings, or other art? Are you an empty wall person or put up all your favorite memories?
September 7, 2011
Dreams are my reality
Oh my god this title is totally taken from the song from that movie – La Boom. Does anybody remember those french movies from the 80s about how teenies find their first love? Soo kitschy and actually too embarrassing to admit to having seen them. Although I am pretty sure almost any European person of my generation has watched them. Which doesn’t make it any better.
Anyway, this is totally out of context. I was gonna tell you about the crazy dream I had this morning after I woke up at 6:30 with Milo still asleep and decided to doze off some more. It’s that evil kind of half sleep that’s not really fully relaxing and makes you dream all sorts of crazy stuff. In the end you wake up all exhausted and emotionally disturbed and wish you had just freaking gotten up when you had the chance.
“I’m exhausted, I have to wake up” is also my favorite quote from my real favorite movie “Science of Sleep”. If you haven’t seen it yet, stop reading now and go watch it. Go! It’s a must see. Apart from it being a very artsy and creative movie, it also holds a lot of truth to me and has parallels to my boring little life. I have always been a passionate dreamer. As long as I can remember vivid dreams have been part of my night life. Often times I had better stories to tell in the morning when waking up than about what happens during awake time.
The science of dreaming really explains everything and boils down to a person being a crappy sleeper or not. I am. Very light sleep here. A house mouse farting could easily wake me up any time of the night. Therefore I have lots of light sleep. Therefore many REM sleep phases in which dreams happen. In those sleep phases only certain areas of the brain are active: Exactly the ones that are responsible for memories, emotions, and visuals. The logical cortex is deeply asleep at that point, so it is not surprising that dreams often don’t make much sense, are highly emotional, visual, and often contain random elements of what we experienced the previous day.
Us humans like to make sense of all the random elements and tie them together as a story. Or even start interpreting them to find a higher meaning. Myself included. I swear I tried to stay away from it. No way I was gonna believe in that bogus when it all makes perfect scientific sense. But then I had those healing dreams. Here is a fun fact about little Nicola that not many of you might know: As a kid I was literally afraid of being late to an appointment. I had ways to drive my parents nuts urging them to hurry so that we could be 30 minutes early that are unheard of. It must not have been fun. But then I started having those recurring dreams where I had to be some place, but getting there on time was impossible. Either my legs were made of stone, they wouldn’t move, the staircase became endless, the elevator never arrived, or all of the above. So my dreams forced me to be late and learn that nothing bad happens. Ever since then I am still trying to be 5 minutes early, but don’t freak out anymore if I am 5 minutes late.
There was also a period in my life where I kept dreaming of dead people. Not very nice dreams, let me tell you that. Basically there was always one or more than one body in my house and I had to get rid of it somehow. I had to roll it away, drag it away, and nobody ever helped me. So I looked up the meaning of dead bodies in a dream book and it said that dreaming of bodies or dead means that one is in a relationship or situation in life that is not good for one and should be ended. Sure enough, a few months later the relationship ended and so did the dead people dreams.
Before I go to dream land, just real quick the dream from this morning: Linc and I had another(!!) wedding. This time it was supposed to be real fun so we made sure to hire comedians as the officiators and all sorts of clowns to entertain the crowd. For some reason we also thought that it was funny to top off the whole show with a McDonalds theme. The rings were presented in a sweet and sour dip container that still had the sauce in it and nobody was really paying attention to the wedding because there was too much clowning going on.
End of story. Now while I go to bed, why don’t you figure out what this dream could possibly mean?
September 6, 2011
Scary stuff
Holy moly, I just spent almost two hours at Lowes! There is just so much wonderful stuff to see that makes me dream about endless possibilities that are restricted by a tight budget, which I already blew tonight. No more spendings for the the rest of September. But the supplies I got should last for a good while and for a bunch of projects that are lined up.
Originally I thought that the dining room is gonna be the next candidate for a makeover. It still had that somewhat tolerable wallpaper, but stood there kind of bland and blah in the middle of our house ad wouldn’t quite fit in with the kitchen and living room. So within only 1.5 hours I was able to pull off an unexpectedly smooth wall paper removal, and was left staring at even more boring walls. What to do, what to do .. let’s ask Pinterest. And there I found this fine little piece of inspiration:

Board and Batten is what it’s called. Never heard of it before, but I’ll take it. Supposedly it is a very simple project that involves only cutting some boards and nailing them to the wall. But then again, it looks like a lot of board cutting and nailing and caulking corners and painting. So I got a little intimidated by the whole thing. Actually quite a bit intimidated. A lot. Scared almost. But I still want it.
To escape this scary room, I quickly moved on to another smaller project. The foyer. While this is the only room where we totally love the wall color and coat hooks were already installed, at first glance it doesn’t look like it needs a lot of work.
But then look a little closer:
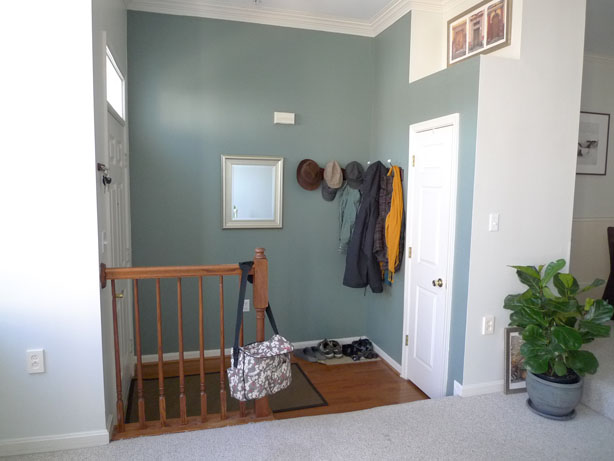
1st problem: Bags are hanging out at the banister, shoes pile up on the floor. Solution: Add storage for bags and shoes. Simple as that.
2nd problem: The banister is ugly. Too oaky, to traditional, and it kind of feels like you walk straight into it when coming into the house. Unfortunately right now it is doing a good job keeping Milo and his toys from falling down the step, so it will have to stay until there are no more little toddlers toddling around. Solution: Paint it white to blend in with the other trim.
3rd problem: The trim isn’t even white. Solution: Just bought a heavy gallon full of ultra white semi-gloss paint.
4th problem: There is an unsightly door bell box hanging in the middle of the wall. Solution: Not sure. What do you suggest?
5th problem: The wall art above the closet is very generic. The only thing it has going for it is that it fits perfectly shape wise. Solution: Change the picture and add something 3dimensional.
6th problem: The ceiling light is not in the photo. But trust me, it is not worth it taking another photo. Solution: Maybe in the long run switch it out for a nice (possibly DIYed) pendant light that ties in the high ceiling a little better.
That reminds me – it’s almost Halloween. Time to get some fall craft going and breaking out some scary moves myself. How about you guys? In the mood for some easy foyer fixing upping? What ideas do you like to make this practical room a little more pretty?
August 31, 2011
Ready, guests, come!
Wow, this was one of the longest drag for a room makeover so far. An estimated two months later the guest bedroom is finally done. For now. Of course there is gonna be more stuff and deco things added over time, but at least it has all practically needed items in it and looks cozy enough. I think this is my new requirement for a room makeover to be deemed completed. We did splurge on the bed. Got a new mattress from Amazon for the fraction of the price of a store bought mattress (Sleep Innovations memory foam mattress, so comfy that Lincoln wants to sleep over in the other room now. Wish I had gotten this for our own bed 3 years ago.) and a new bed from Ikea because we just couldn’t find a nice one on Craigslist and trust me, I’ve been checking every single day for two months. So at least for the price we got something completely bed bug free and hope that our guests will always want to return to this nice bed.
Here are the details on the makeover:
 Darn, I just noticed that the pattern of the curtain is upside down. Oh well. I am so happy that I found this fabric at Joann’s. It matches the yellow in the duvet cover perfectly and brings some sunny elegance to the room. Got it with a 50% off coupon for $20 and made the curtains in two evenings. (One evening equals two hours in Nicola currency).
Here is a vintage suitcase for $2 from a yard sale that will one day get legs and become a real night stand. A cute lamp for $5 from Goodwill. And some printed travel wisdom in a white painted $3 IKEA frame that had been waiting for its use for 3 years.
 For the bed we had to reuse the old duvet cover because it just wasn’t in the budget to get a new one. I know, this one is very colorful and kind of dominating the room, but just imagine how changing it up one day will be like another entire room makeover in one step.
To fill all the empty space above the rather low IKEA Malm bed (we chose this bed because we did not want to overpower the small room with a huge bed, we had already gotten a free Malm dresser, and because it fit in our car), I created some bigger sized wall art. Had some old canvasses on hand, painted them white, folded some origami boats out of left over maps and hot glued them on. Done.
From some leftover curtain fabric I made the two small pillow covers to replace funky orange ones that we already had.
 On the opposite side of the bed I framed some postcards and envelopes from all over the world in some more super old IKEA frames that I bought in a picture frame obsession 3 years ago and never used. They are the cheap ones that come in 3 packs. They are plain wood and can easily be painted or embellished to match any decor.
On the shelves that I have no problem with in this room (as opposed to Milo’s room) I arranged some random items that we had and that somewhat belong in a guest room: travel guides, some novels for entertainment on all those long vacation days, a hand-sewn elephant that reminds me that I still want to go to Africa one day, a miniature VW van for dreaming of road trips, etc.
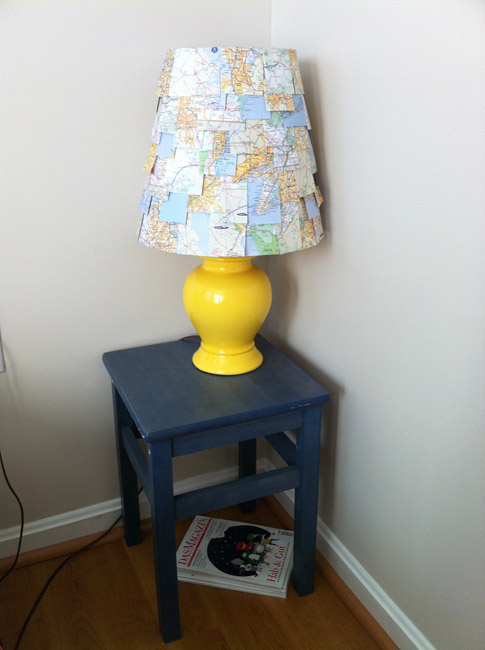 And then we have the previously introduced map lamp. I think all the materials for it were $4.
The little stool/side table thingy is one of those items that are a classic bargain: When I saw them at a yard sale they were super cheap (I think it was $2 for two of them an my mom paid for it because I had conveniently forgotten my cash at home) and seemed somewhat practical, so I got them even though I had no idea what exactly they could be used for. Now one of them is serving as a makeshift nightstand and the other one is holding a fan in Milo’s room. They are also really practical to get up to the slightly too high shelves.
If the bed hadn’t busted our budget, this would have been a really budget friendly room makeover. How do you like it? Is it too travel thematic?
So there you have it, another room done and here is a little hint as to what is next: one of the rooms in a house where you don’t want light colored carpeting.
August 23, 2011
The huuuuge 1!
August 12, 2011. The day of Milo’s first birthday ever! It started with Milo waking up screaming at 5 AM and then me melting down because I just couldn’t take those 5 AM wake times anymore. Afterwards we both went back to bed and at least Milo was happy when he woke up the second time. I think this is the only memory I have from my little one’s actual birthday.
But luckily we got another chance the next day. We both got plenty of sleep and had a great party. The weather was a little unstable, but who cares. We just moved the whole shebang indoors. Yay for our house which fits approximately 15 kids and 15 adults and still has some room for everyone to run around like crazy. Milo had a blast and it seemed like everyone else had as well. Thanks everyone for coming and bringing so much joy to our little boy’s life! Milo loves all the toys he got and every morning he has a hard time deciding what to play with first. Peace and Love, The Trans.


