
By: Nicola
August 11, 2011
What The Heck Is Mod Podge?!!
Never heard of it before until I found some awesome craft ideas that require to use it. Since I have about three such projects on my to do list, I went out and bought it. I still don’t have a clue what it is exactly, mostly because we don’t have a similar thing in Germany. Anything that I cannot compare to something familiar I grew up with automatically falls into the category of unexplainable weirdness. Anyway, it glues and it seals preferably paper or fabric onto other surfaces. And that’s all I need to know for now. So I went ahead and did a little mod podge project in half an hour of my evening.
Here is why:

And here is how:
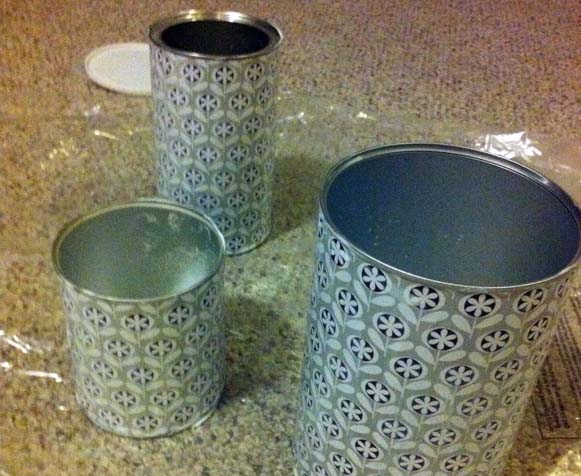
1. Save some empty baby formula and coffee containers
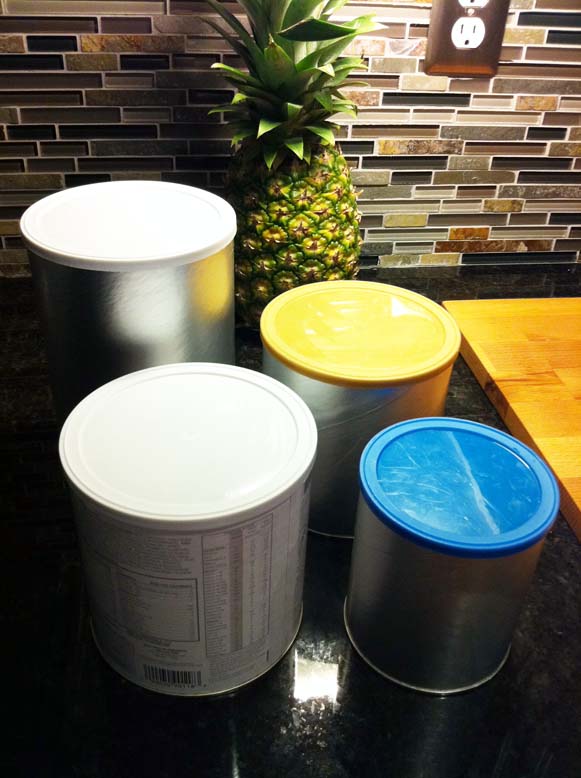
2. Cut some pretty scrapbook paper of your choice into strips of the height of the can from the top metal rim to the bottom metal rim. I went with this modern floral pattern to stay within the neutral colors of the kitchen, but lighten things up a little.

3. Apply mod podge with a (sponge) brush to the paper or to the paper AND the container. Do not apply it only to the container as the paper will start wrinkling once it starts to soak up the podge from the can. This is the part where you can learn from my mistakes.
4. Glue the first couple of inches of one end of the paper onto the can and make sure that it aligns parallel with the top and bottom rim. Then wrap it tightly around the rest of the can and smooth it out by stroking with your hands. (Sorry, no pictures for these two steps as I needed my hands and they got all moddy).
5. If the diameter of the can is more than a foot, you will need another strip of paper to fill the gap. If you want to be perfectionistic about it, you can try to match the pattern, but I chose imperfection and just cut a random piece which will sit at the back of the container and stare at nothing but the wall.

6. Apply an even layer of mister moddy podgy over the paper surface. Let it dry and apply another one. And another one, if you want to be extra safe.
7. If you keep the containers in a splashy area, you can probably go ahead and finish them off with some poly spray. This is on your own risk though. I haven’t tried this yet, but I assume that the awesome podge seals the paper sufficiently so that the poly wont harm it.
All done!

August 11, 2011
More than words
So, recently I made this framed piece of wisdom to hang over the suitcase nightstand in the guest bedroom. I have never really been into hanging words onto walls just because they are so literal and usually I find pictures more subtle in expressing what I want to say. But then again, words are way more specific and why not contribute a little bit to keep the lost art of reading alive.
When it comes to creating wall art, I don’t like my handwriting enough nor do I trust the steadiness of my hand. Therefore I gladly take on the help of internet and computer for matters like these. I guess I don’t have to go too much into detail about how to print on paper, but I don’t want to miss this opportunity to share with you one of my favorite internet pages besides Pinterest and Kuler when it comes to design stuff: Dafont! You can download thousands of funky, pretty, exotic, or stylish fonts for free and will for sure find the right “handwriting” for your project. The one I used for my travel words is called FFF Tusj. Here are just a few samples of what else is out there:

August 2, 2011
Pinterest Challenge
Some say that everyone needs their addiction. So far I have proven those people pretty wrong. Always being the independent control-freak-self addiction spells danger to me. The mere thought of needing a certain substance or thing in order to get on with the day freaks me out. This rather radical attitude has gotten me through life without ever feeling the need to try cigarettes, coffee, or other evil things I don’t even dare to mention. Until I met Pinterest. As soon as I wake up there are already great DIY ideas waiting for me and I won’t sleep until I make sure that I haven’t missed a single inspiration that day. It’s dangerous. Seriously. Or like one of those funny pins says:

But, here is where my built-in alarm starts ringing and the control center in the front of my brain kicks up gears. In one of my strong moments I made a rule for the addict part of me: No more pinning unless I actually implement one of the DIY ideas in real life. At least one per month. Or every 20 pins. The yarn wreath was the first one. And then these crazy crafty girls over from younghouselove and associates started a Pinterest challenge last week. The idea was to make one pinned idea become reality and then come back today with the result. Well, it just so happened that I was in the middle of crafting a map lamp for the guest bedroom when the challenge started, so here we go:

Unfortunately I was already half way through the project when the challenge started (and excuse the greenish light from the window shades), so there is no real good before picture of the lamp. But you can picture it: it was a regular lamp. Yellow porcelain base and white shade. Nothing crazy. Got it for approximately $3 at a yard sale.
I also got maps of the entire USA at Goodwill for $1. They looked very unused and useful so I almost felt sorry to cut them up, but they were from 1996 and probably not as up to date as google maps on my phone. Therefore they were cut into little squares and rectangles of slightly different sizes. I wanted them to not look completely uniform, but somewhat related to each other. Then I started glueing them onto the lamp shade in a carefully planned irregular pattern starting on the bottom and working my way up and around. I made sure to cover the tops of the layers below so that you cant see where they start. Kind of like this:

The finished product has most of Maryland, some Florida, Colorado, and DC on it. All spread out to be found and explored by our guests. Sorry to not have a better picture on hand at the moment. I took it in a rush before Milo came home. Will replace this one tomorrow. Welcome home map lamp:

And this was the inspiration pin:

Of course the original looks much more artsy and whimsical. My little yellow lamp has its own Nicola twist to it – a little more organized and clean. Like it?
July 31, 2011
Home Decor on a Budget
Let’s face it: Home improvements cost money. Sad , but true. Also true is that I have a very limited budget to spend every month. But no need to get all teary-eyed – just one more reason to get creative. Here is how to make home improvements happening on a tight budget:
1. Set a budget! Duhh! That’s kind of given. My “budget” is usually pretty general: Get everything for as cheap as possible. Cannot exceed $100 a month on total expenses. Other folks probably swear by setting a specific cost for a specific project, but in reality you never know how much things are gonna cost, or what additional materials you need, etc. So I am just trying to accomplish as much as possible on my monthly budget and anything that exceeds it has to be delayed until later. Absolutely necessary big ticket items (like a mattress for the guest bedroom) will go on the credit card and have to be paid off within 2 months.
2. Do it yourself! If only it was that easy. Have I mentioned before that in addition to little money I also have very limited amounts of time left over? I know, the most logical approach to life would be to work hard, make lots of money, and then spend it on finished products and hire contractors to do the work. Or the other way around: Work little, have more time, do everything yourself. Well, I guess I got the best (or worst) of both worlds. Here is how I squeeze home improvements in my weekly routine: (more…)
July 26, 2011
Bye Bye Marilyn!
The first tiny little improvement in the guest bedroom is done. Marilyn was separated from the light switch and had to make space for a very plain white switch plate cover. Makes a big difference already, but now I am getting even more ambitious and thinking about something fancier. Maybe prettying up the cover with some cute paper?

July 26, 2011
Willkommen, bienvenue, welcome!
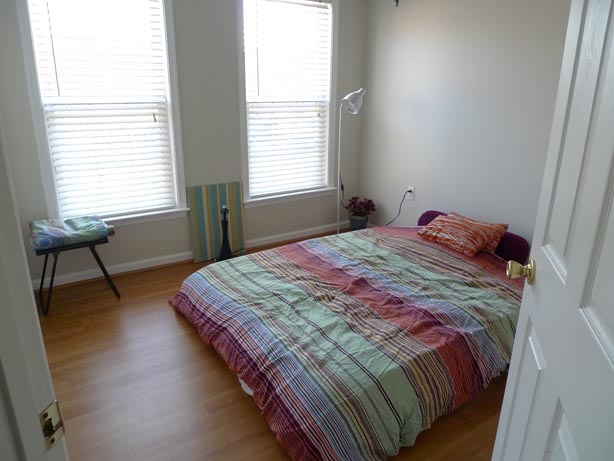
These are the future colors that will welcome our hopefully many dear guests. Yes, while it seemed like I was just sitting back and relaxing to recover from the last major room makeover, I have been secretly getting very excited about the next project – the guest bedroom. One, because this room is a very blank slate. All we have at the moment is bedsheets. Two, because this is a room we won’t use on a regular basis I expect very little interference from my practical-oriented husband. Yayy! Last Saturday morning I ran some errands to gather all materials needed for the DIY parts of the makeover and also happened to run into this great moving sale and scored some great vintage finds for the room.
This is what the room looks like at the moment:
And here is the scoop about what is planned:
– Keep the shelves (figure that!) and decorate them with travel-themed collectibles
– Buy a mattress and find a cheap white bed frame or make a headboard out of old wood
– Make nightstands out of suitcases
– Hang curtain rods and sew curtains
– Make some wall art
– Ideally change out the bed sheets for something more matchy with the new room. But this depends on the budget.
These ideas from Pinterest are my inspiration:


July 21, 2011
Happiest wreath of the block
After it took me “only” 4!!! weeks of making over Milo’s room (man, I wish making over the house was my only full time job!) it was time for a quick reward project that could be done in two evenings.
Another one of those placeholder items that came with the house had to make way for some real style. The wreath.
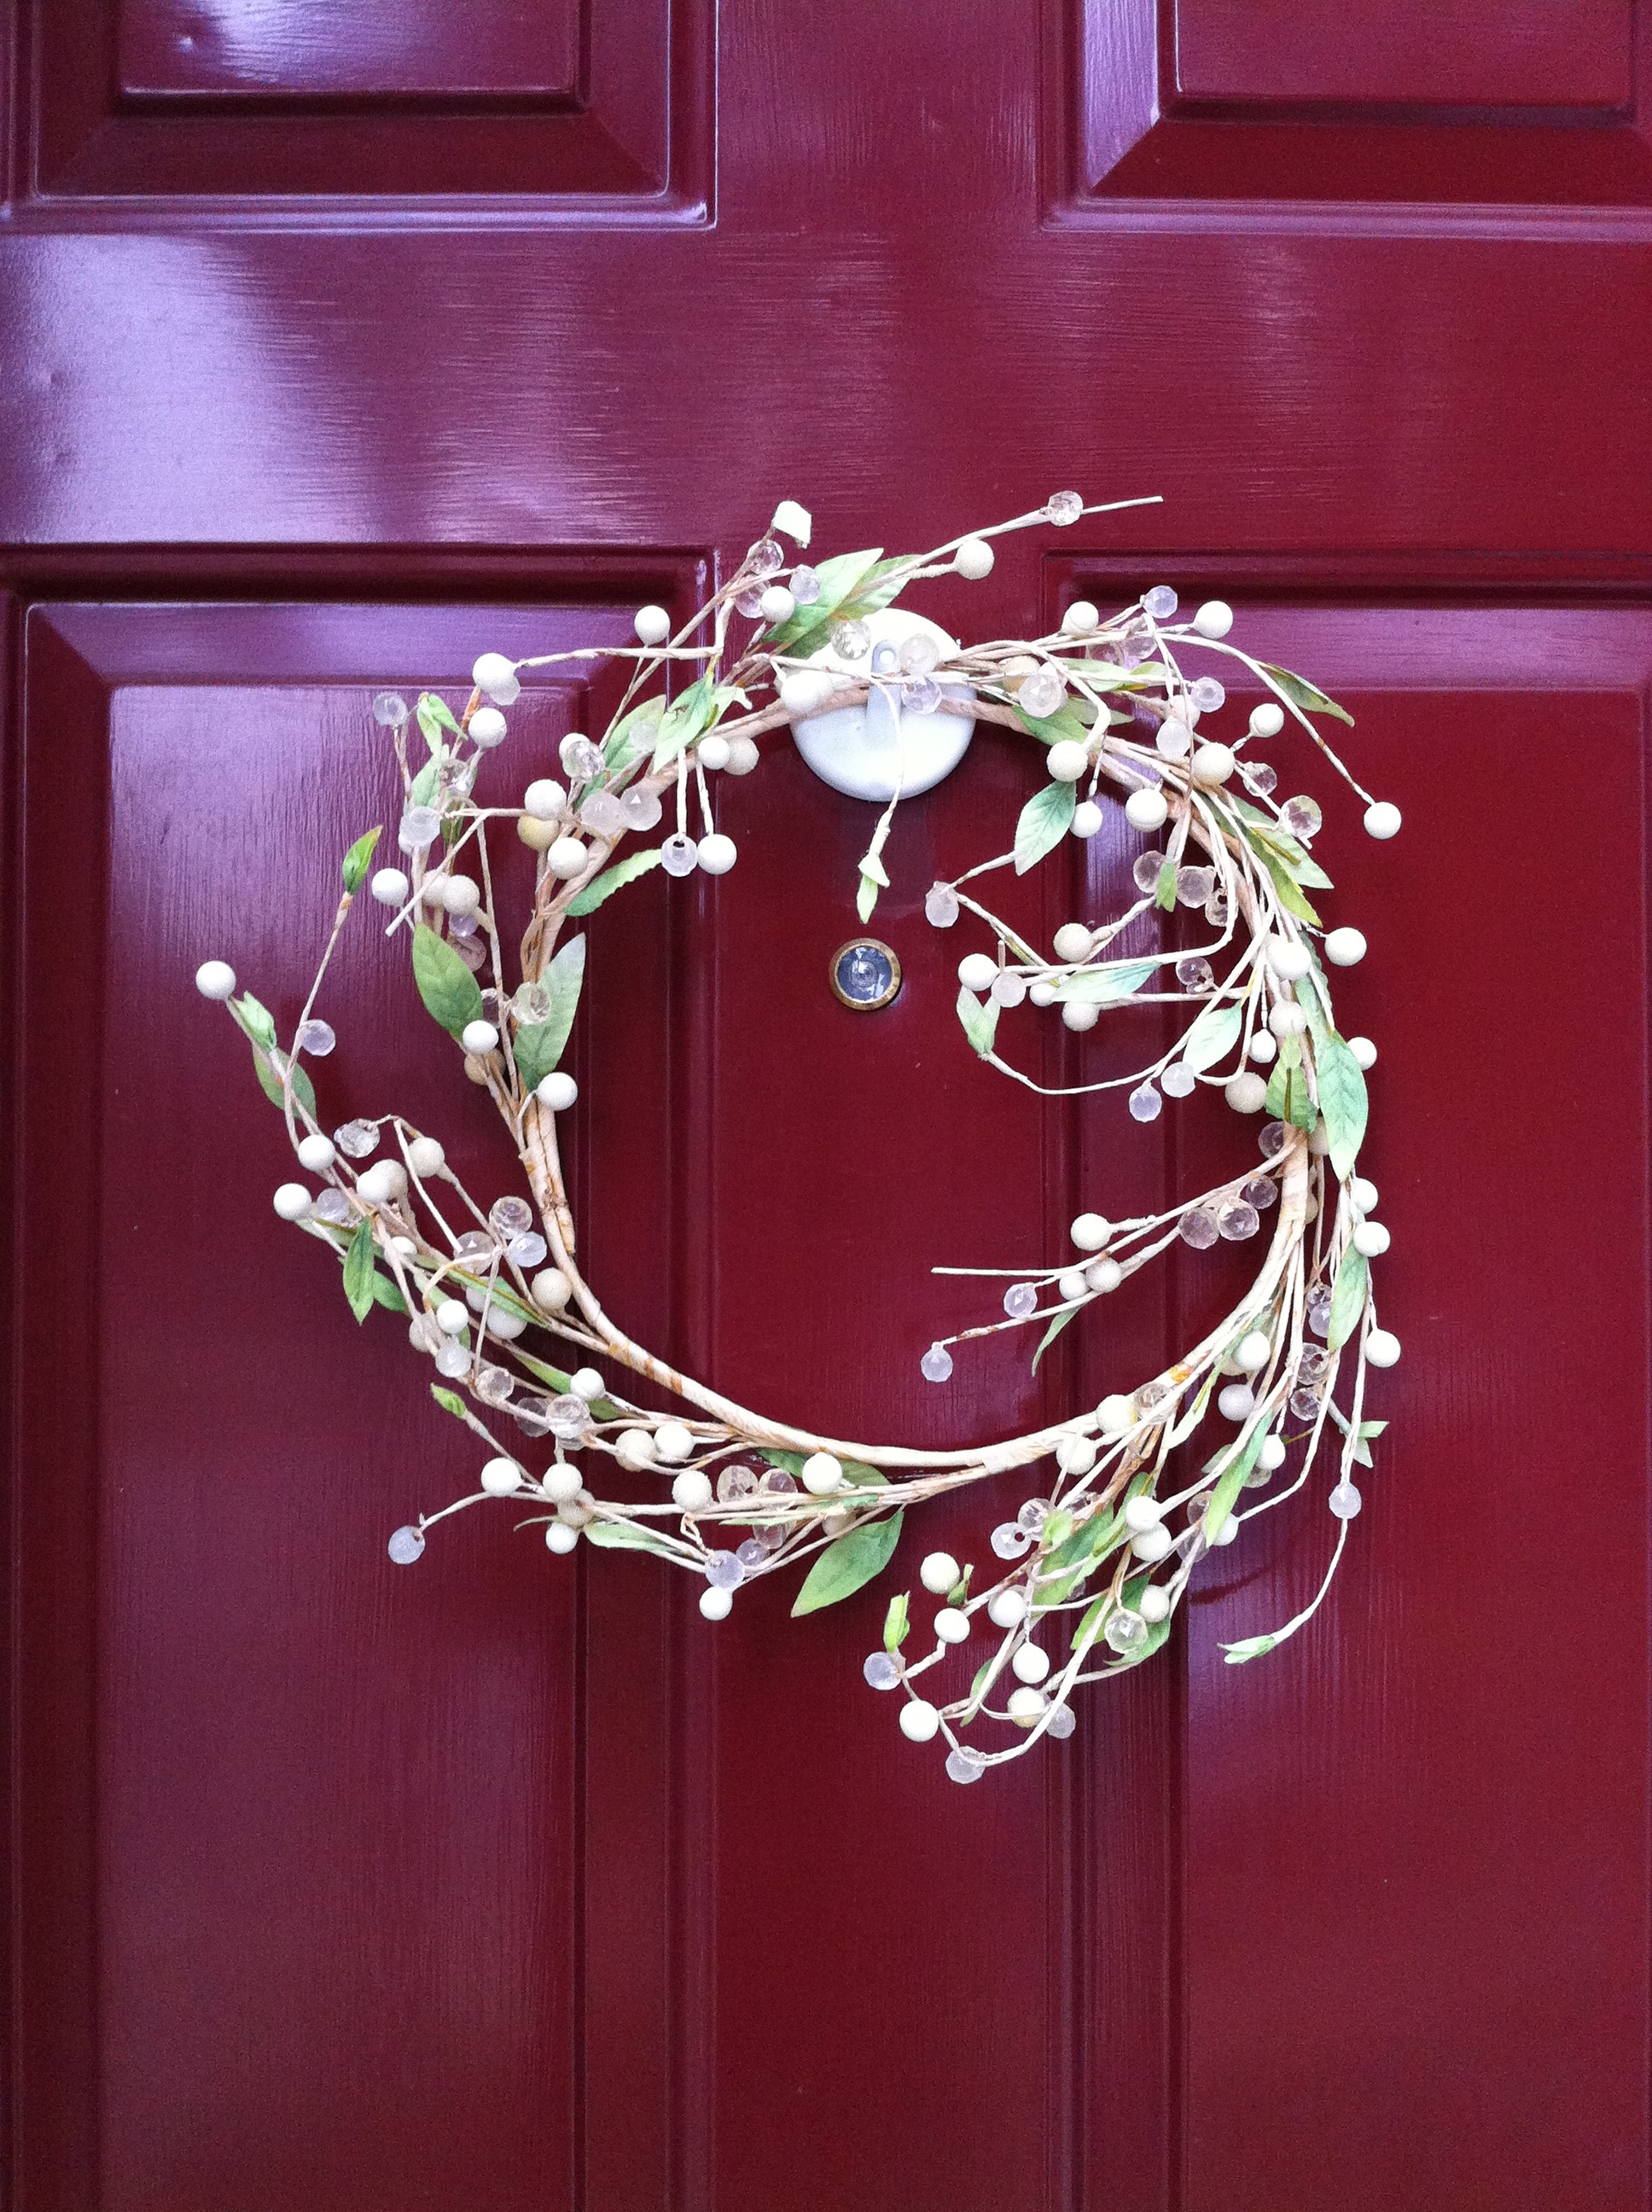
While I spent the first 30 years of my life in the belief that wreaths on the door are for old grannies only, this modern twist of the round door decor got me inspired:

Source: mostazaseed.blogspot.com via Nicola on Pinterest
Find the tutorial for the wreath and the felt flowers on it here. The only thing I modified was to wrap the styrofoam ring with batting and ribbon to give it some more volume underneath the yarn. And this is the cheerful result that greets our visitors from now on (in reality the blue is more teal, and the orange more yellow):
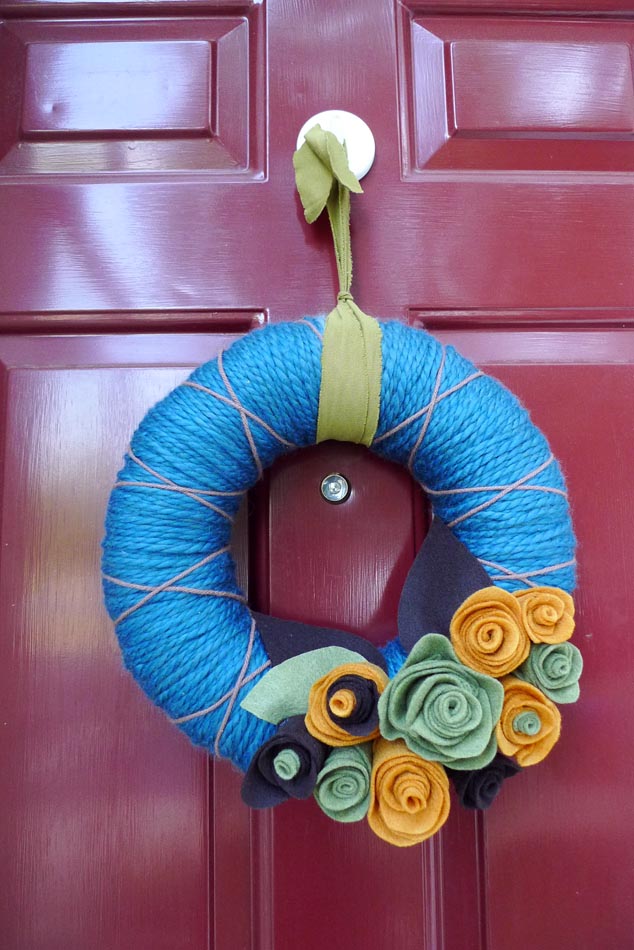
Doesn’t it totally want to make you stop by for a visit?