
In: House
December 4, 2011
Chopped!
Another one of those things that nobody tells you about when you have kids is the post-pregnancy hair loss thing. Just a few months after giving birth your hormones make you start shedding hair like a dog. While at that stage it wasn’t that obvious to me how much hair I really lost (I have always been know for losing and leaving my hair everywhere) it became very clear a few months later when all the lost hair started growing back in. Suddenly there were millions of tiny baby hairs growing in all over my head while the length of the old hair started to look really sad and thin. With my hair’s tendency to frizz at just a hint of moisture you can imagine what that looked like. Like sporting an afro at the roots with a mullet in the back. Kind of like this:

Well, more like this:

See all the one-inch craziness going on around my face and the kinda droopy barely wavy hair in the back (emphasized by my sad face)? Not pretty. Compared to all the curls I had going on for most parts of my life:

And the peak of thick, curly and long hair during pregnancy:
 
Babycenter’s explanation for this phenomena is that “normally, about 85 to 95 percent of the hair on your head is growing and the other 5 to 15 percent is in a resting stage. After the resting period, this hair falls out — often while you’re brushing or shampooing it — and is replaced by new growth. An average woman sheds about 100 hairs a day.During pregnancy, increased levels of estrogen prolong the growing stage. There are fewer hairs in the resting stage and fewer falling out each day, so you have thicker, more luxuriant tresses. After you give birth, your estrogen levels take a tumble and a lot more hair follicles enter the resting stage. Soon you’ll have more hair coming out in the shower or on the brush. This unusual shedding will taper off and your hair will be back to its pre-pregnancy thickness about six to 12 months after you give birth.”
Say what?!! Will be back to it’s pre-pregnancy thickness? How is that possible? It’s gonna take about 5 years for all the mini hairs to catch up with the old long ones.
At this point I realized that there was probably a second good reason for moms to cut their hair shorter. While I bravely endured a baby and toddler pulling on my long hair that I proudly wore down almost every day, this hair loss finally made me do the unthinkable. Do what all moms do – chop them off. Four sad inches fell to the ground when I was getting a $9.90 haircut from my one and only favorite Hairdresser Zoreh at Mastercuts in the Columbia Mall. But it was all worth it.

I immediately felt so much lighter, fresher, and ten years younger. Lincoln says he has a brand new wife now and that’s kind of like I feel. I guess it was time.
As a special perk and to spread the joy of haircuts I actually have another one of those $9.90 haircut coupons to give away to any Columbia MD resident. Please reply to this post with “Chop’em off” and tell us what your hair is like these days. I will randomly draw a winner using random.org.
November 28, 2011
It’s beginning …
… to look a lot like Christmas in our home.
Who would have guessed that I have been secretly crafting Christmas decorations like a maniac in the past few weeks? Well, everybody who knows me, I guess. Since we have never had a Christmas in our own home before and were constantly on the move in the past years, we are starting pretty much from zero regarding holiday items. Getting the whole house into Christmas spirit could have easily gotten an expensive maneuver.
So I broke out my hot glue gun, some Michaels coupons, collected natural (free) goods outside, used some existing non-holiday items, and went on a thrift shopping spree. Considering the materials that I was able to gather for cheap and my love for mother nature I came up with a snow-white-silver-glistening-walking-through-the-forest theme for my very first Christmas collection. Think snowflakes, white, wool, twine, twigs, trees, silver, pine cones, … I’m gonna call it Winterwanderland. See here what I whipped up for under $40.
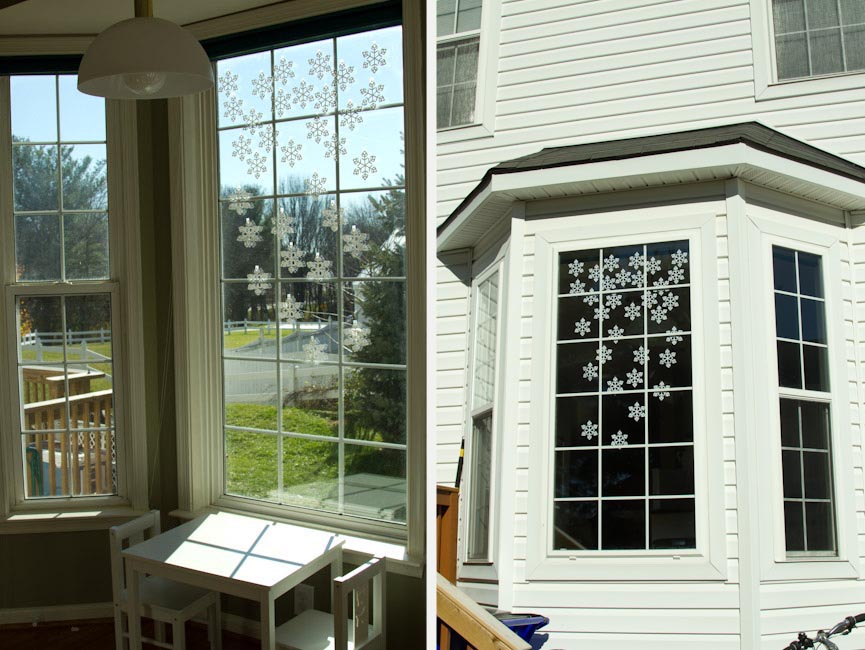
Paper snowflakes at the kitchen bay window. I was planning on cutting these out myself using this method, but then I found a bag of wooden tree ornaments at my new favorite thrift store (2nd Ave) that I wanted anyway for $1.90 and these paper snowflakes were randomly packed in the same bag. So they were basically free and saved me an evening of paper cutting. Milo loves looking at them when he eats his breakfast, but they look even better from the outside where the light hits them.
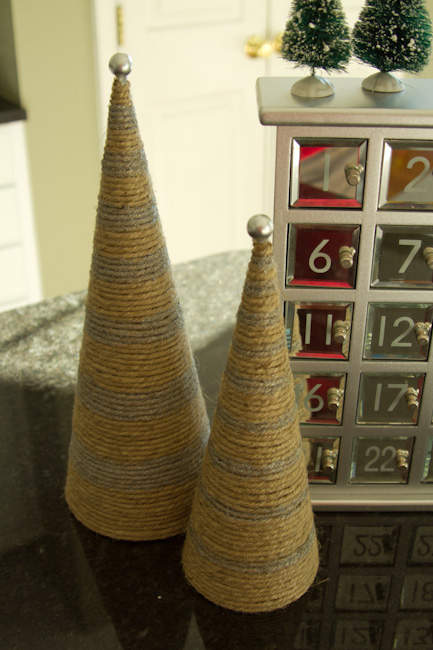
Mirror Advent calendar. This silver advent calendar with mirror doors was a thrift store find some time in spring for $3. Good thing I am looking forward to Christmas all year, so I bought it back then and now it fits perfectly in with the other decor. Oh, I added those trees on top, in case you were wondering. $1 from the Dollar Store. I am having a little bit of a hard time finding small enough items to put in there for Milo that are not chocolate treats (any suggestions?), so we might have to upgrade to a bigger, home made calendar next year. And then use this one for chocolates for Linc and me.
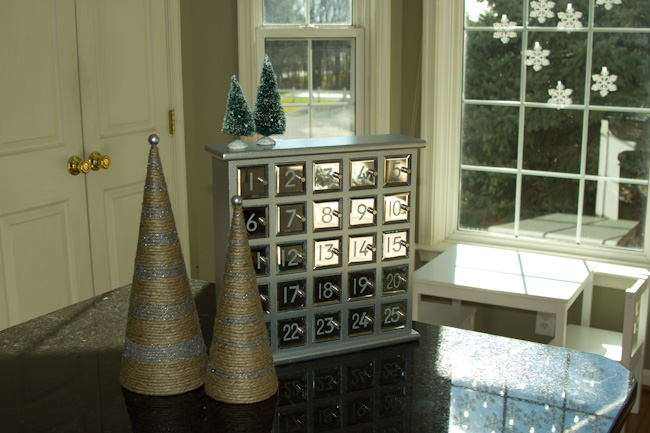
For the cone trees I got some papermache cones for $4 total, wrapped them with twine that I had from a previous project, added a silver ball (leftovers from my Advent wreath), and some silver glitter paint.
In the dining room this Advent wreath is making a statement as a modern version of the traditional Advent wreath.

This was probably the most expensive item of my collection. Even with using coupons and sales, I probably spent around $15 dollars for all assorted natural ornaments, filler balls, and candles. Unfortunately I forgot to snap photos of the process, but here is approximately how it goes: Get a flat wreath base. I found a wooden ring at Michaels, but you could probably even cut a ring out of thick cardboard. Place your candles in the middle to make sure they have enough space. Start with hot-glueing down the bigger ornaments. Then start filling in gaps with medium size pieces, then really small ones. You want to cover all of the base and achieve an even ring.
For our current table setting I just flipped over the colorful place mats that were previously seen here. How convenient that their back side perfectly matches the natural color scheme.

On the other side of the dining room we have this whole paying bills in the woods scene going on:

On the desk I arranged some pine cones (found for $0 in my backyard) in a silver vase ($5) to hold current letters (aka bills). The star was on sale for $4.50 at Joanns and temporarily replaces my dry-erase board. I swapped out the desk cover with a piece of burlap (this piece is just a fraction of the 3 yards I got for $5 and will use for other projects).

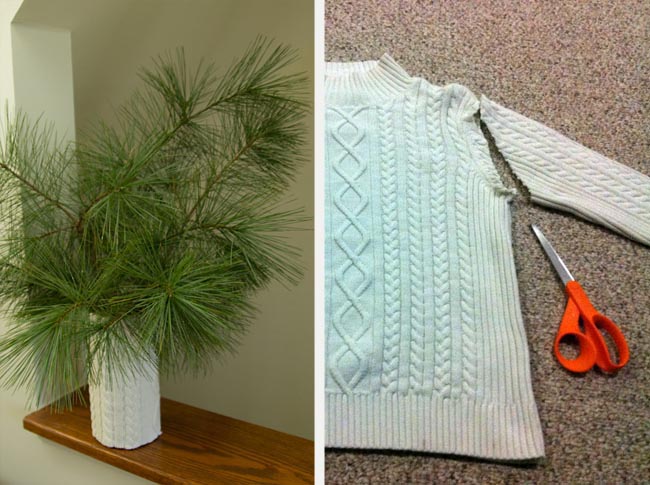
On the ledge I arranged the old candle sticks that were spray-painted white together with the dining room chandelier a few weeks ago. I made the sweater vase from a leftover sleeve of my wreath project and a vase from our wedding (cylindric glass vase, hot-glue sweater around it. Done). The pine is from a downed branch behind our house.
Similar woodsy stuff is arranged on the other ledge in the living room. Some more pine, some more pre-existing candle sticks, and other assorted items.

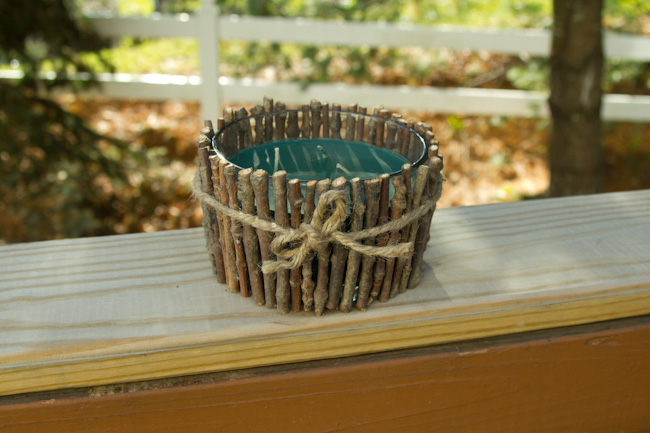
The big candle and the twig vase (currently housing a tea light) were made with my – you guessed it – hot glue gun. Milo had great fun helping me find sticks. Although he was done after finding one – actually two – one for each hand. But he learned a new word and we spent a good hour outside, so it was officially the first time Milo was crafting with me.

Then I just had to snip them to size and glue them around the straight glass. To use up the very rest of my twine, I wrapped them up with a small bow.
Moving over to the center of the living room, we have this entertainment arrangement providing snacks and candle light to our guests. The thrifted multi-purpose tray makes it removable for play action. The silver chalice is holding little chocolate treats.

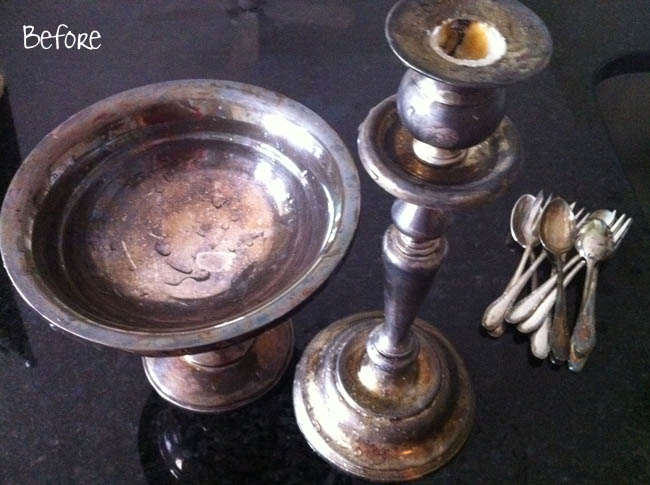
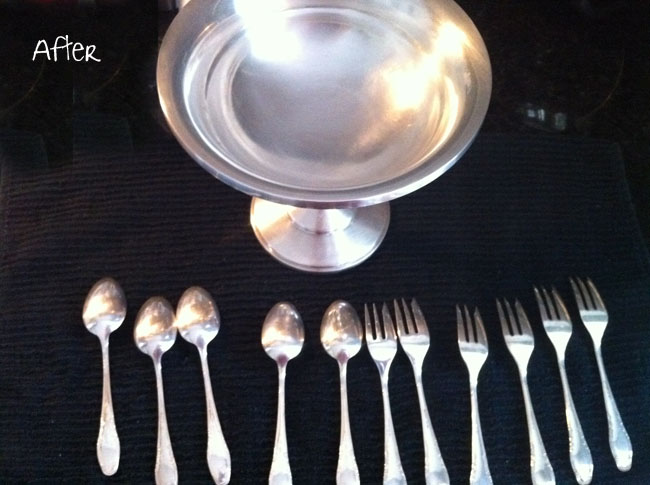
Speaking of silver. These two shiny items were one of the first purchases that Linc and I made together for our first rental home. We found them at a thrift store for about $6 with just a little bit of patina. Over the years the black smoke monster got the best of our two silver possessions and they were not really presentable any more, therefore kept in the dark basement cave together with some random spoons and forks that I don’t even know where they came from. Until I saw this tutorial about how to clean silver. So I gave it a shot. See here the before and after:
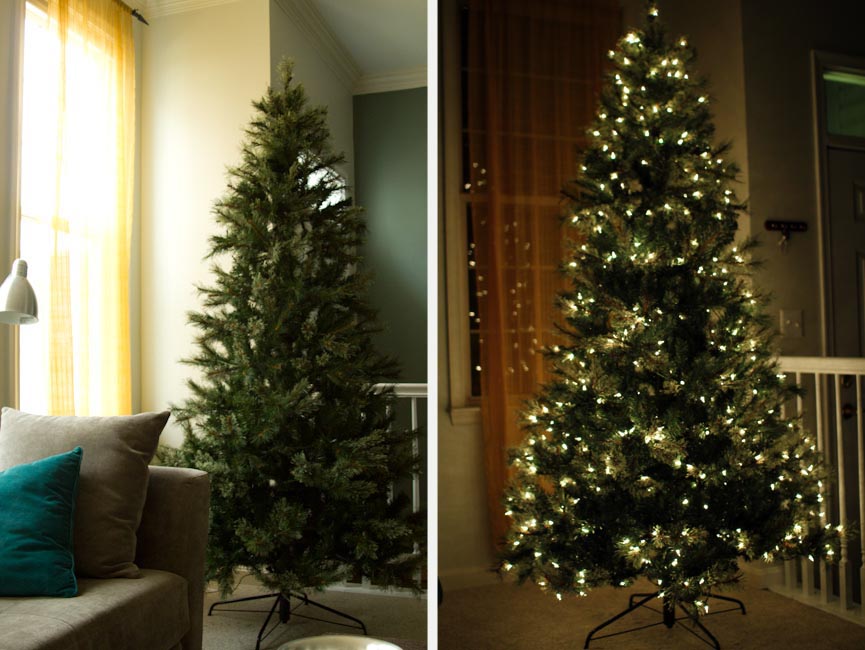
Last but not least, a sneak preview of our undecorated Christmas tree. Let’s leave it at that to end this post on a positive note. More about my adventures with artificial Christmas trees to be posted soon.
November 26, 2011
My Dear Storage Ottomans
My two beloved guys are starting to feel a little outnumbered at home. An increasing number of storage ottomans is taking over their living space and are getting more attention than probably justified. I can’t help it. I’m in love with storage ottomans. They are really great. They hide a good amount of regularly used stuff, but always keep it handy for when you need it – the perfect middle ground between having stuff like bags, toys, etc. lying around and putting them too far away from where they are being used. You can rest your feet on them, or sit down, or lean your heavy Milo head on them when you get tired from playing but no way! wanna go to bed. They come in all shapes, colors, and sizes – you just gotta find the right one for you. The only downside is that most of them are really pricey. No way am I gonna pay more than $50 bucks for an upholstered box.
Yay! Time to get creative. Well, ottoman number one wasn’t really a product of high creativity, just a lucky find at Ross for $50. This faux leather guy is standing in the foyer and holds all our bags, Milo’s supplies for on the go, and serves as a seat for putting on shoes:
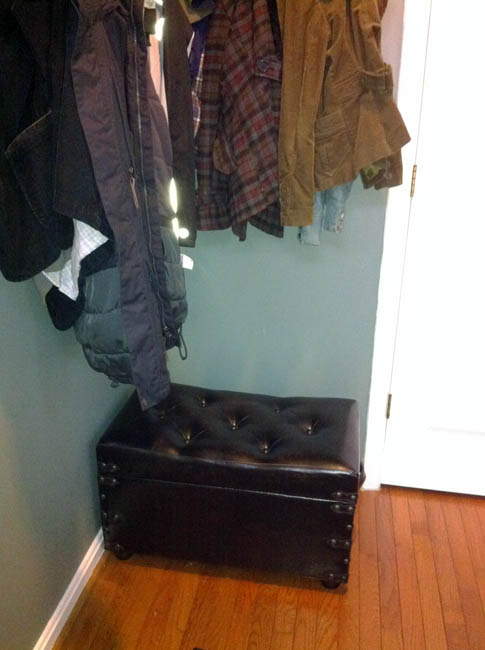 (Seriously, how many jackets do 2.5 people need!!!)
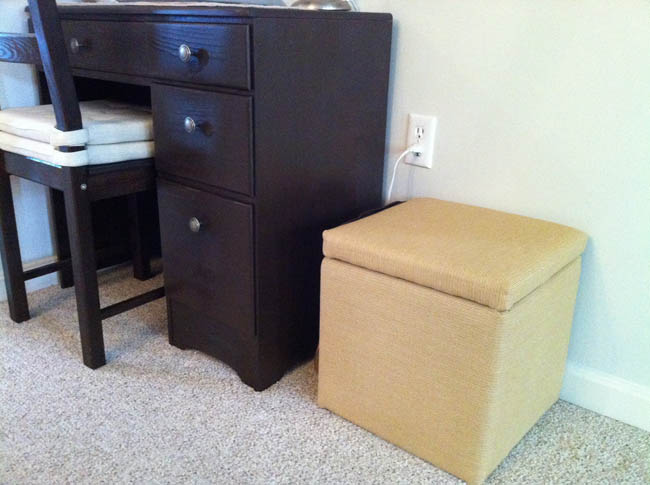
But wait, it gets better. Storage ottoman number two was a much cheaper purchase of $16 and more of a craft project.

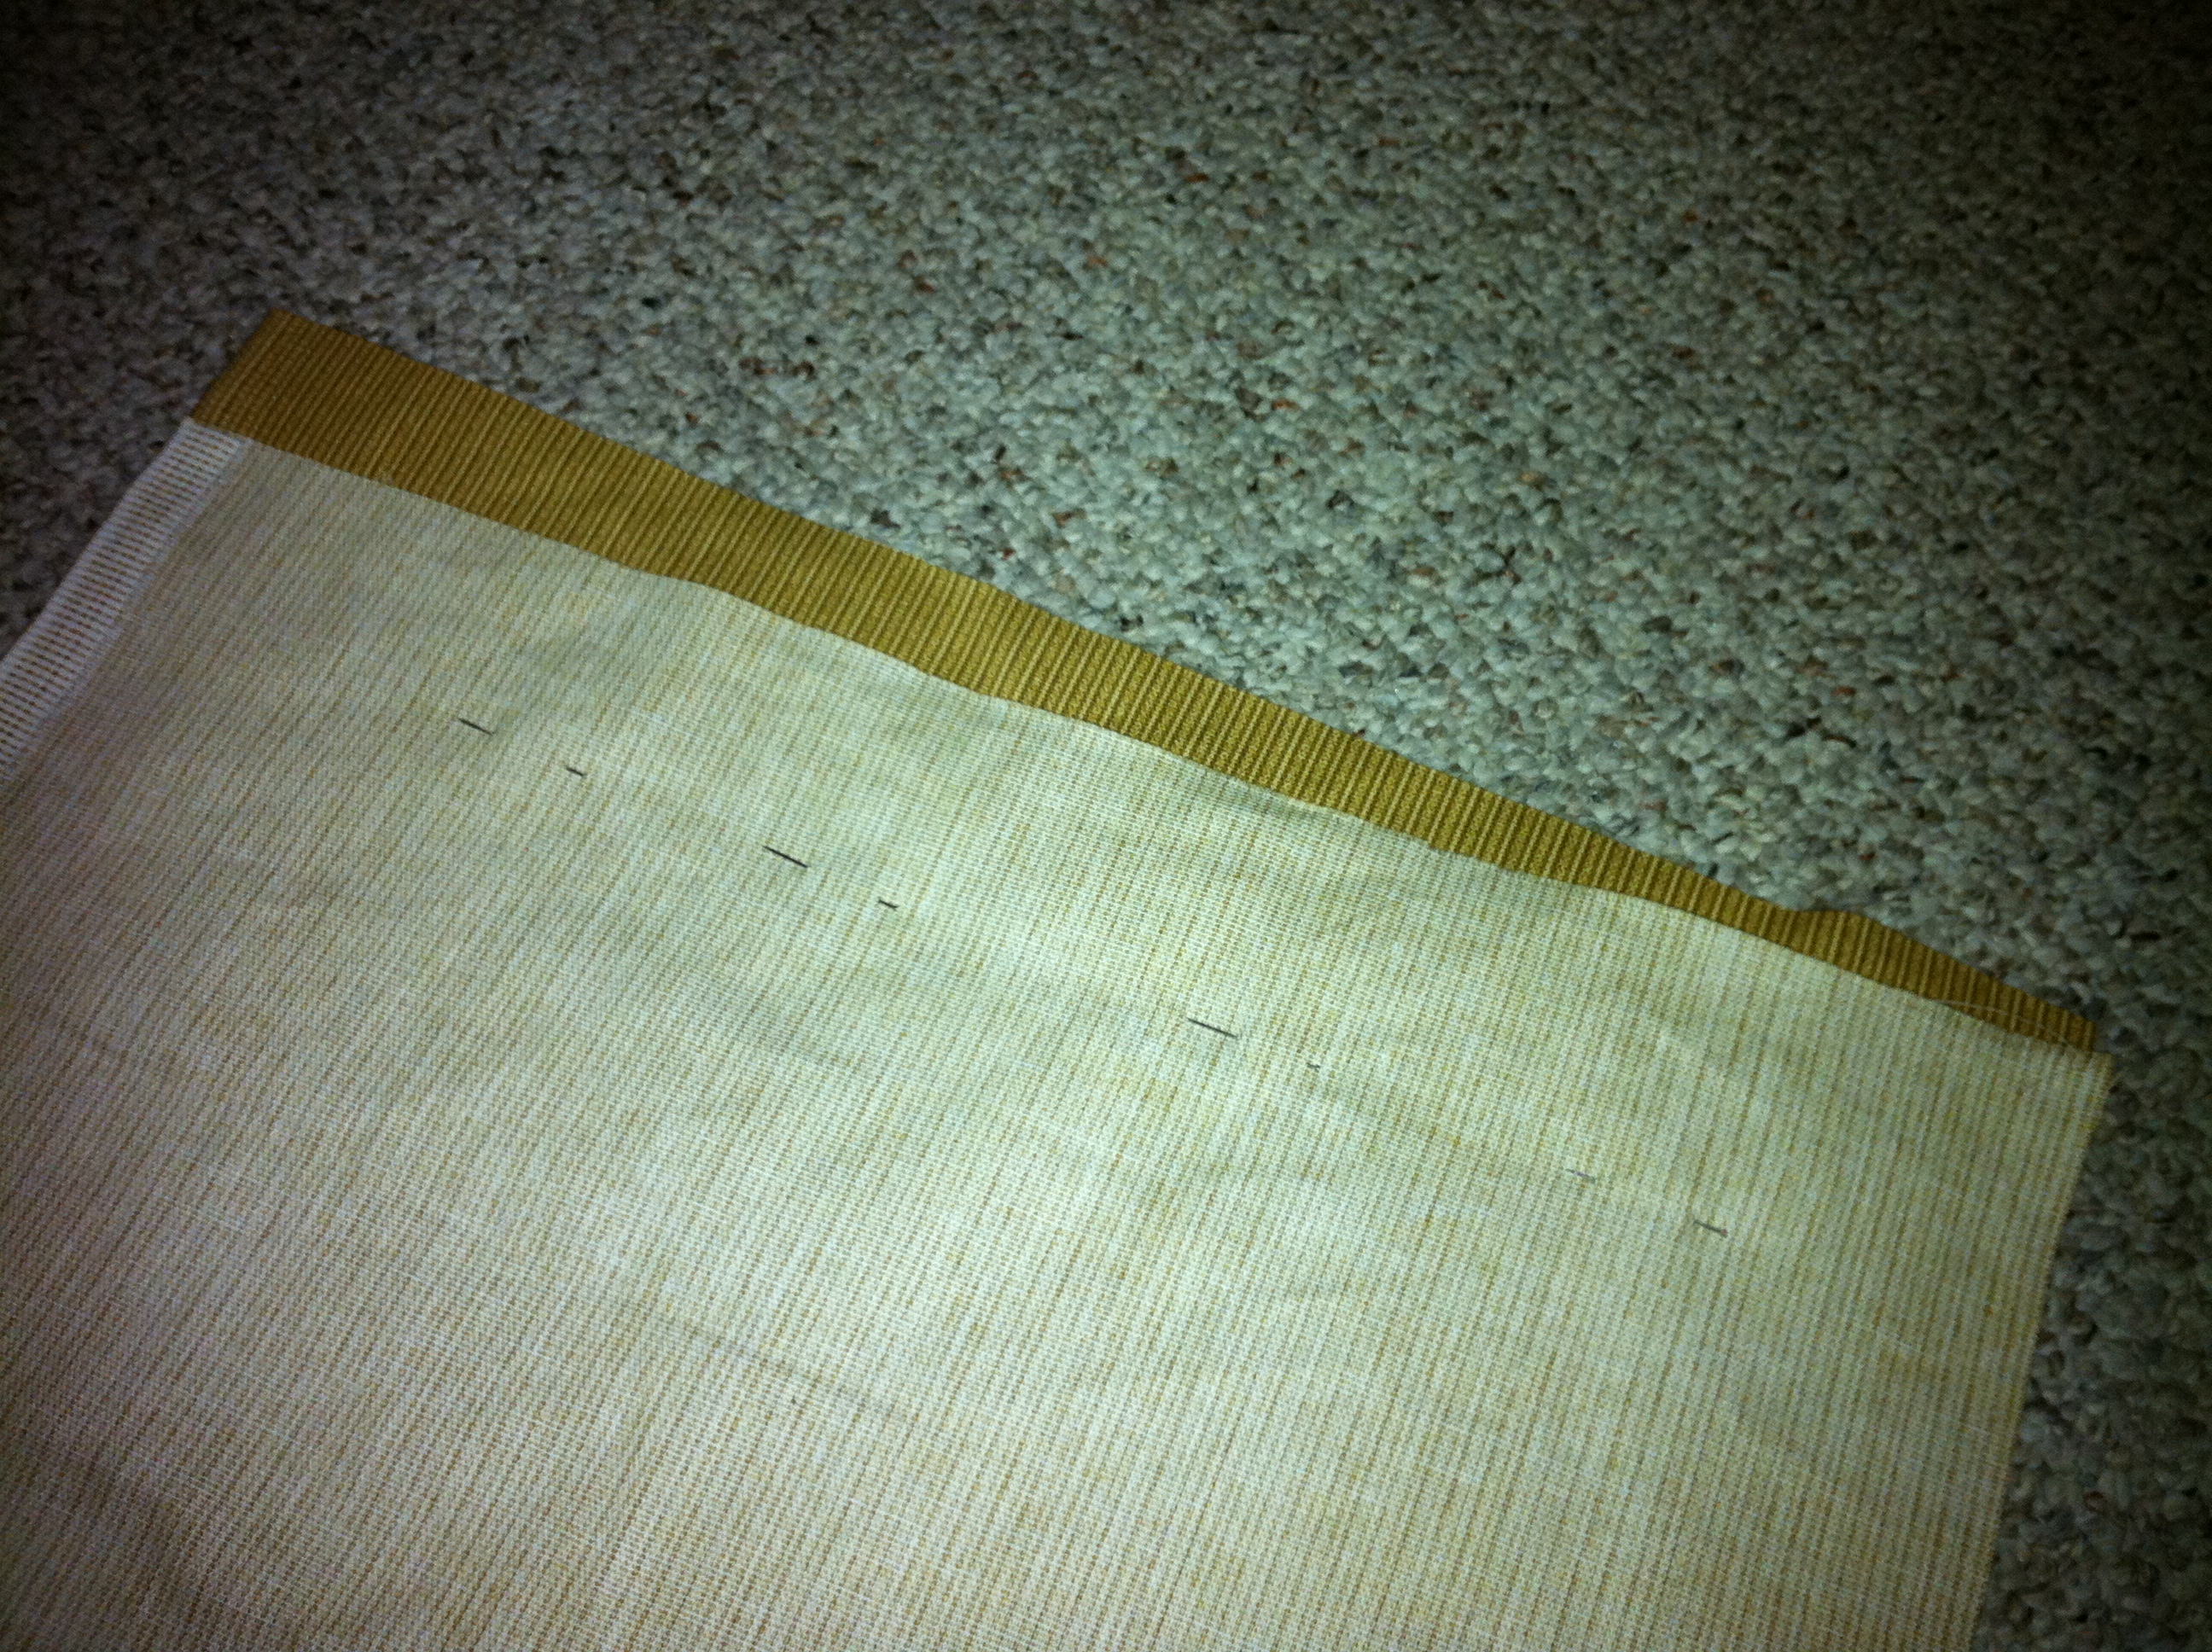
He was supposed to hold the overflow of tools next to my desk, but definitely needed a little more wow to spice up my work nook. Since my favorite golden yellow hadn’t trickled into the dining room area yet, I decided to go hunting for a patterned yellow fabric at Joann. Unfortunately I couldn’t find anything with a bold pattern that would match color-wise, so I went with a plain striped fabric. And here’s how it goes:
- Cut off the piping around the top because it would look bulgy under the new fabric.

- Measure the fabric with a few inches of allowance for stapling. When measuring the allowance, fold the rough edge of the fabric in because you don’t want it to be visible later. Then wrap the fabric around the top and bottom and make sure that the end lays on top of wooden structure that you can actually staple into otherwise the fabric will not hold onto anything.
- Lay the square for the top wrong side out and centered onto the lid. Then pinch the corners together and pin them where you want your corner seam to be.

- For the body we will sew a tube. So just wrap the long piece of fabric around the whole box (wrong side out as well) and pin it together for the seam. Make sure to make the tube tight enough to look fitting later, but so that you can still take it off now. Alternatively you might just want to mark the bottom and top of both fabric layers with a fabric pen, then lay the fabric down and pin a seam.

- Sew your corner seams and side seams as pinned. Cut off all excess fabric.
- Pull the slip covers over the lid and body so that the seams match up with the corners.

- Now it’s time for stapling. Whichever piece you start with, always follow this rule: Punch in just a few staples at one side, then pull fabric tight to the opposite side and staple there. Never do one entire side first and then the other entire side. The fabric won’t come out straight and tight that way. In this manner, work your way through all sides, but leave out 2 inches from each corner for now.
- Lastly, staple the corners. Lay down the fabric on the corner, then fold over the fabric on one side like you would gift-wrapping a box. Same on the other side, and then maybe two staples onto the corner to flatten things down.


Voila!
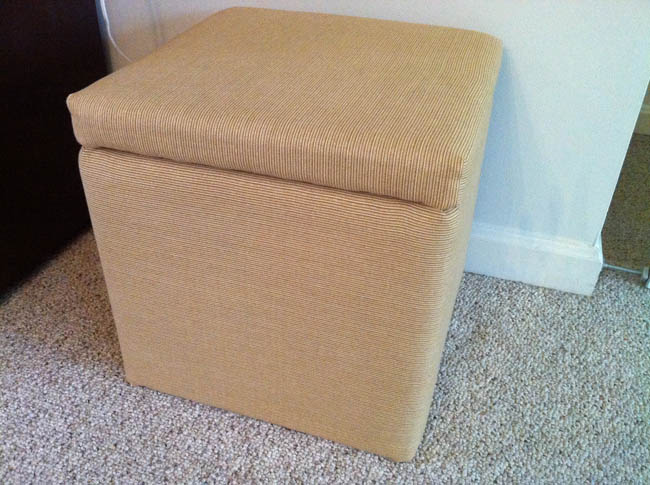
Down the line I am planning to stencil some modern floral pattern in white on it. As soon as I find a cool stencil anyway. Looks already much better than the mess before, right?
But now let’s get to the biggest ottoman makeover yet. What was once one of the most controversial piece of furniture that I brought home from a yard sale, turned into our great new coffee table / ottoman / toy storage trunk in the living room.

Read the whole story here.
So, are you an ottoman believer yet? Or do you have a fully grown fetish for them like me? Come on, it’s really hard to deny how incredibly practical those guys are.
November 22, 2011
C H R I S T M A S ! ! !
See the title above for how excited I am about Christmas this year. If you happen to know how excited I was last year to go to Germany and introduce my baby to friends and family, then double that. Wait, triple it. Minus the fact that I won’t get to see my family this year. But – this is gonna be my boy’s first Christmas that he will consciously experience with our little family’s first tree ever in our first house ever. Thinking back to my own childhood and how excited I got every year for Christmas I can only imagine how much fun he will have with all the lights and am on a mission to make it the most memorable first Christmas in history.
Christmas to me is all about family, friends, and love. Call me a helpless romantic, but I get all sentimental and lovey-dovey in December when it’s dark and cold outside, warm and fuzzy inside of the home, the radio stations play cheesy Christmas classics, people put up lights, cozy up with their loved ones … sigh! This is the time of the year when my pragmatically wired brain gets a rest and the rarely expressed emotional side of Nicola has free reign. Nobody knows about this, but it is pretty likely for me to spontaneously get teary-eyed from fuzzy feelings when driving in my car and listening to Christmas classics.
Now, I’ll be the first one to admit that I am a little bit of a Christmas opportunist. I fully indulge in the romantic spirit that comes with it, but am not too much into celebrating the religious reason for it nor into consuming tons of expensive goods. Not even for the sake of this sad economy. As far as the birth of Jesus is concerned, I think it’s totally cool that people still think back to such a significant event and celebrate it in one of the finest holidays on earth, but I’m not gonna lie and say that that’s on my mind a lot during December. If you really want to know my my humble opinion – there are so many good reasons and ways to celebrate love that it doesn’t really matter how and why you do it. Just show some loving for each other.
Now that that is out of the way, let’s talk business. Here is how Christmas goes down in the Tran’s house. Well, this is the first time we actually have our own house to celebrate Christmas in, so there will be a lot of firsts for us this year. First time impatiently waiting for Thanksgiving to be over so that Christmas decorations can be put up and almost starting to happy dance at work because Lincoln gave in and let me put up stuff 5 days before Thanksgiving. First time (in my life ever) to have an artificial Christmas tree. First time keeping Milo from taking down ornaments from the tree. The list goes on ….
But over the past few years of our young marriage we also established some original Bieringer-Tran fusion traditions that are made to last. The great thing is that we can pull traditions not only from 2 different families that we grew up in, but also from 2-3 different cultures. In Germany Christmas time starts four Sundays before December 24th. It’s called Advent and is the time of anticipating Christmas. Every of the the four Sundays people light up an additional candle on their advent wreath until all four are burning by Christmas. (Of course they are not kept burning the entire time, only when attended. Mostly for long and cozy Sunday morning breakfasts.) This is what a traditional advent wreath looks like on the first Sunday in Advent:

During Advent the Germans bake many many Christmas cookies. These are made according to special recipes that you won’t find during the rest of the year. Cinnamon, nuts, and chocolate are typical ingredients. Find a version of my favorite cookie recipe by clicking on the picture:

Next thing is the Advent calendar. It comes in many different forms and levels of creativity. The basic model is just two pieces of paper with the cover sheet having little doors cut out and the sheet behind showing picture of winter scenes. It can also have chocolates behind the doors, or really take on any 3dimensional shape like this for example:

All of them boil down to having 24 doors, socks, boxes, envelopes, or bags that hold little goodies like sweets or small toys. Every morning of December the kids are allowed to open one of them (with the number of the day’s date) until Christmas Eve is here.
Then, on December 6th we have the day of Saint Nikolaus, a guy who must be somehow related to the American Saint Nick. Basically, he was a very good man who helped people in need, gave away gifts, and died on December 6th. Read the whole story here. So, in Germany all kids polish their shoes or boots on December 5th, then put them outside of the front door and hope that they were good enough for Saint Nick to put some goodies in there. The next morning everyone gets up really excited to find some small gift, nuts, oranges, and chocolates in their boots.
Can you believe how much anticipation all of these traditions build up by the time Christmas is finally here? No wonder that with my 31 years I still get so excited about it. Christmas in Germany, by the way, is on December 24th. Christmas Eve. That’s the main big deal. It’s when families get together in their homes, sit by the real pine tree singing Christmas carols (at least my Mom was trying to keep the singing up until the bitter end), having a festive meal, and exchange gifts. So, whenever we are in the US for Christmas we are having Linc’s immediate family over on Christmas Eve for a three course meal and do the big gift exchange one night before all other Americans. And then it’s American Christmas again the next morning! I am in the process of making stockings for the three of us and will fill them with a small gift on Christmas Day. Hm, that’s only one American tradition. Can you tell that I am the big Christmas tradition initiator in our family? What other things do Americans do for Christmas that I am missing?
November 16, 2011
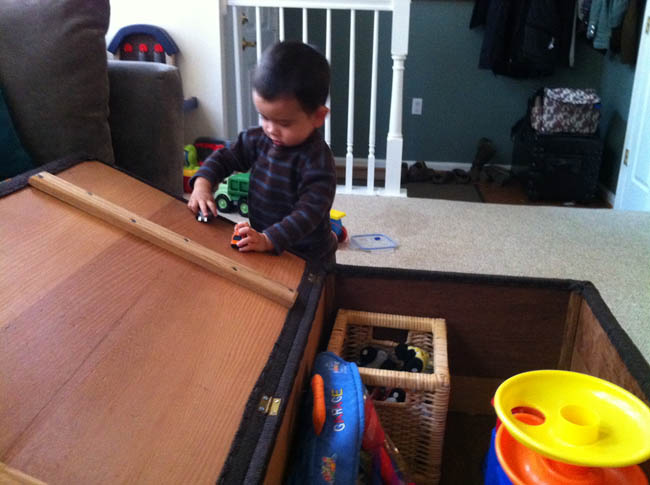
Trunk Gone Ottoman
Yard sale season is pretty much over and I know at least one person that is not sad about it. Lincoln always gets very worried when I go out on a yard sale hunt wondering what old piece of crap furniture I will bring home this time. But hey, so far I have scored some really great finds that just needed a little bit of elbow grease in order to shine. Like my ten dollar desk. Or this ten dollar trunk:
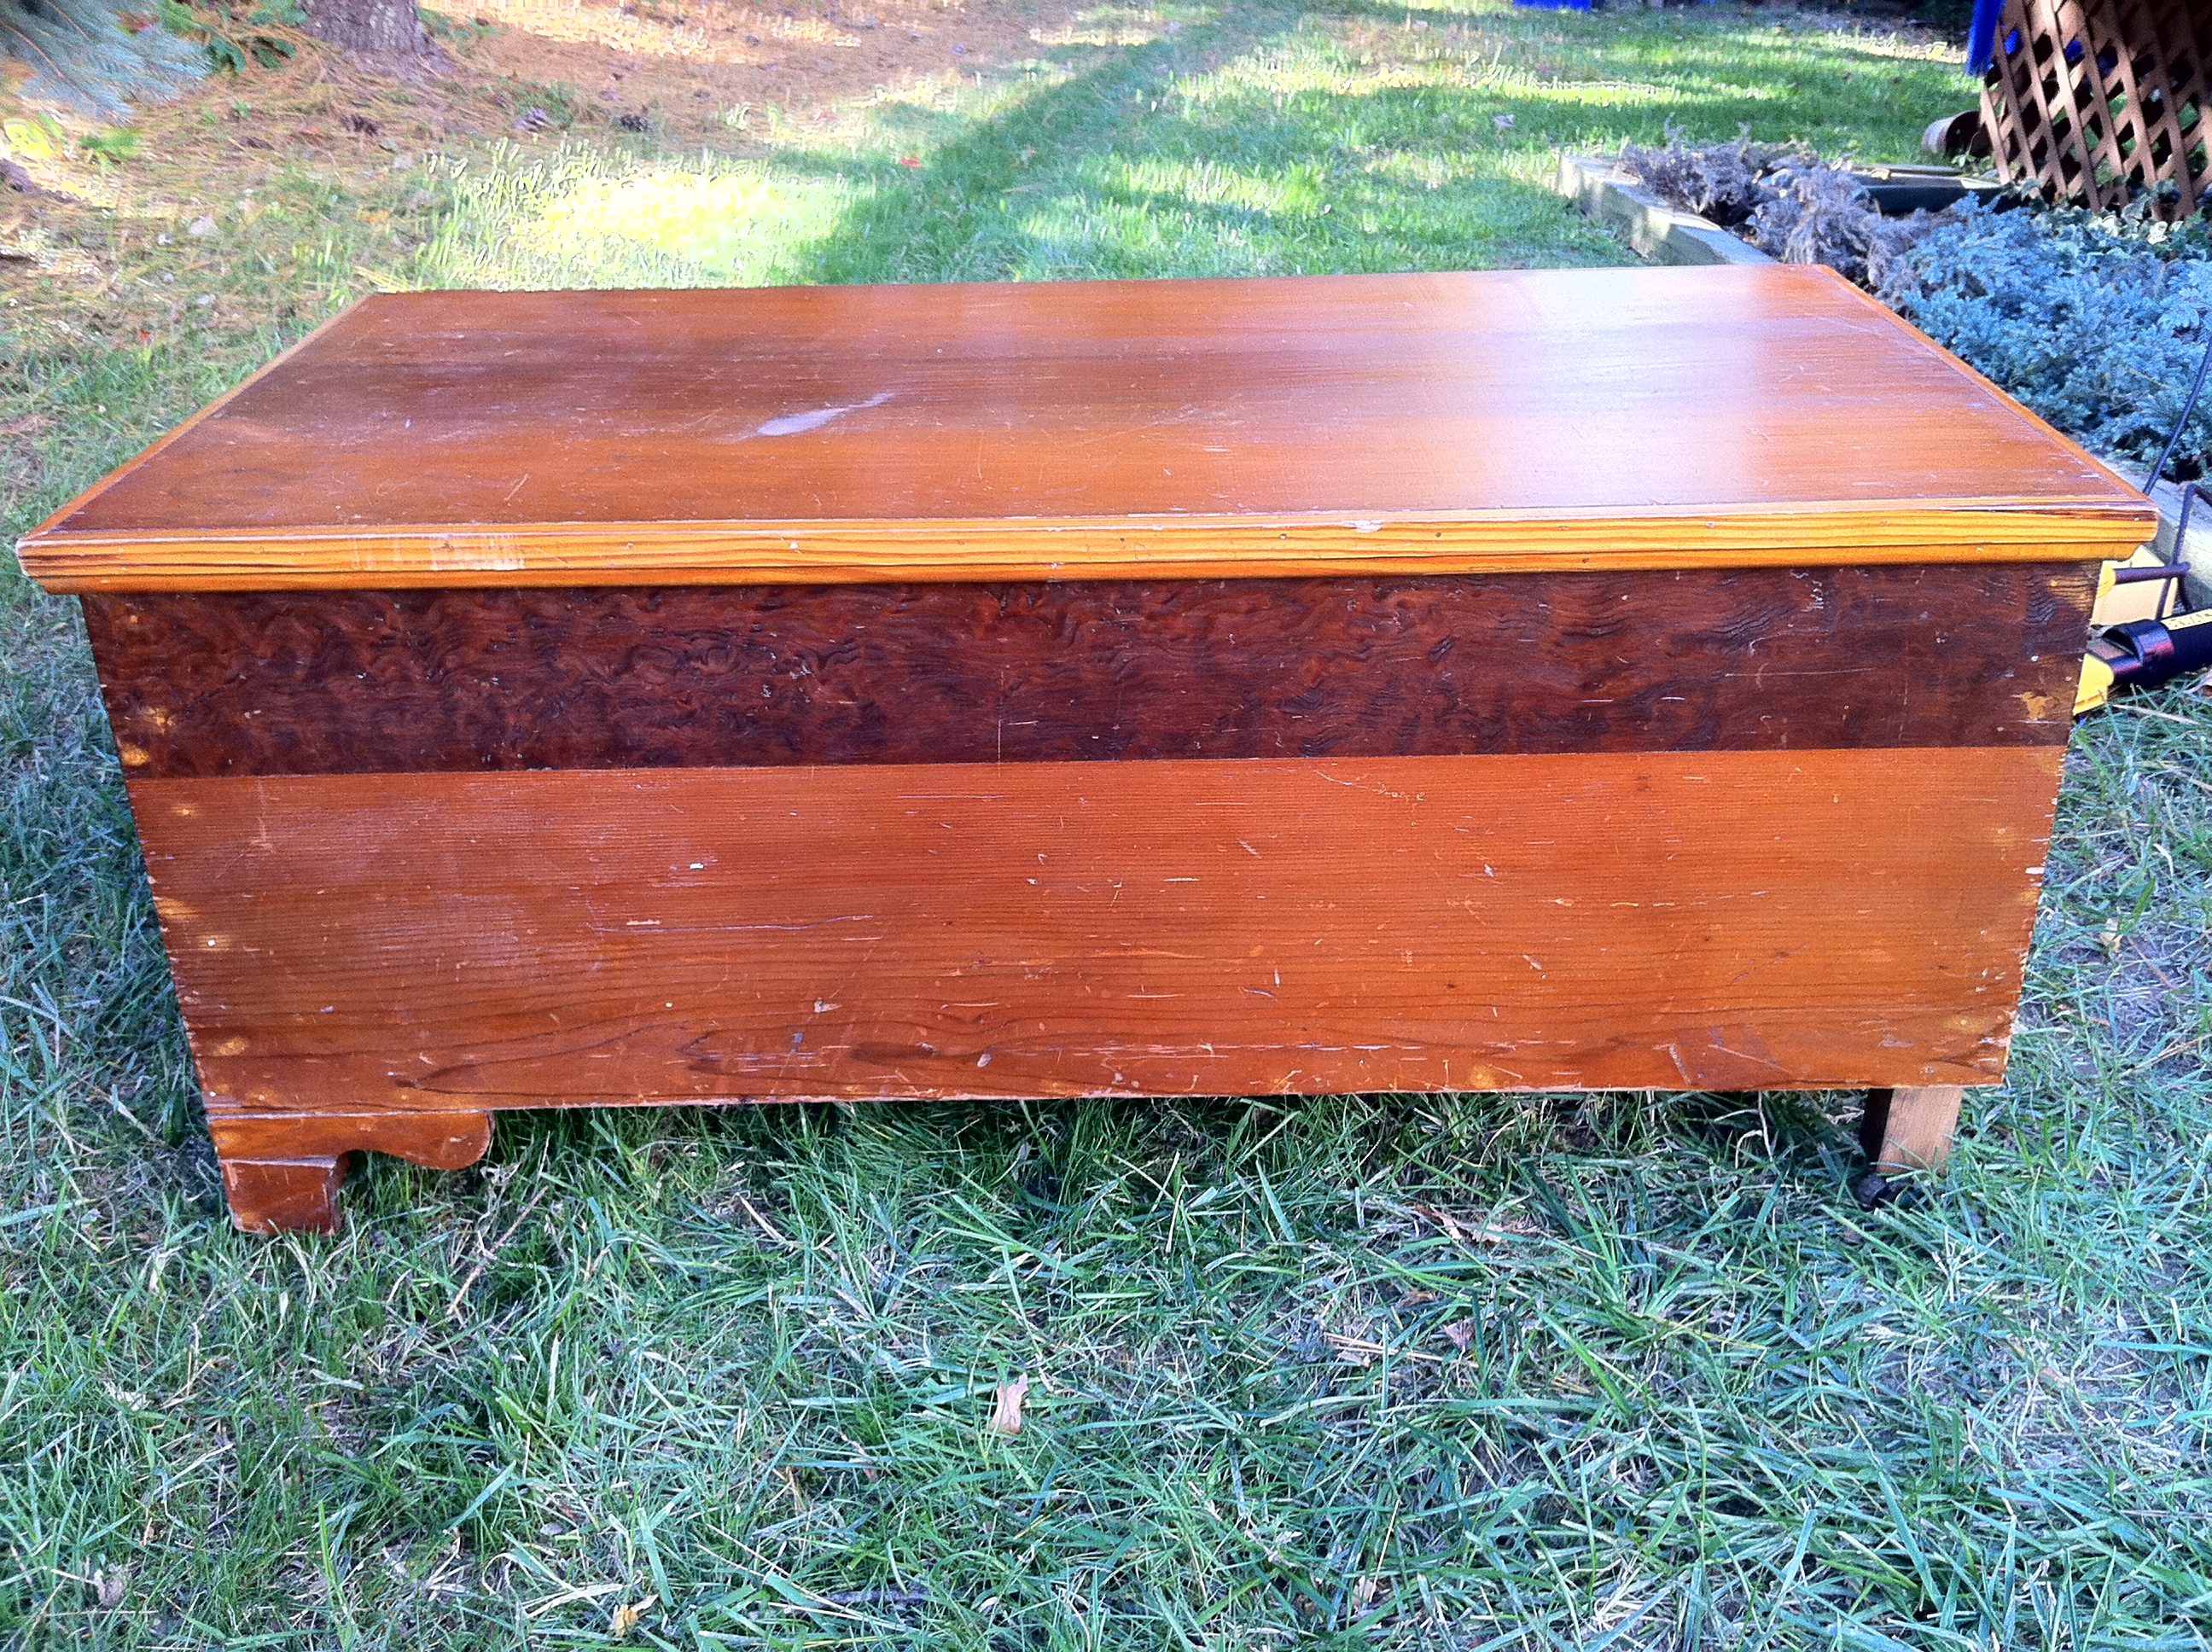
I purchased it together with a big family of spiders and their webs in early summer for $10 and yes, it took a while to tend to it. But finally, here is the result:
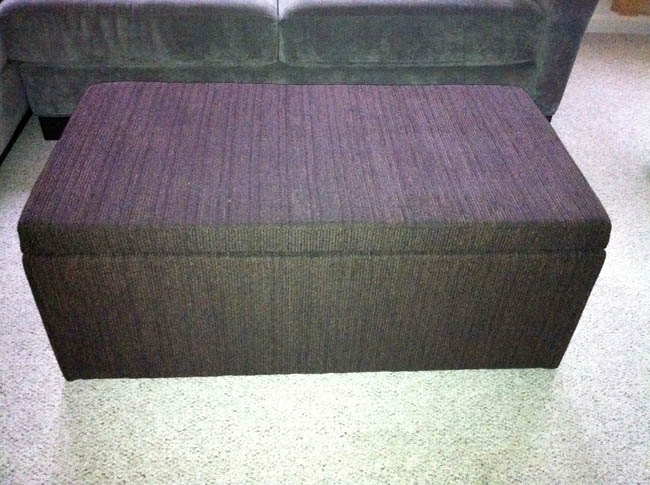
Would you have recognized it as the same trunk? Here is how it all went down: At first I wasn’t quite sure what to do with the thing and where to put it. When I saw it at the yard sale I instantly knew that it would be very practical. I just wasn’t quite sure where in my house I needed this extra storage the most. First it was gonna go at the end of our bed. But then the massive amounts of toys in our living room started to really get to me and so the trunk found its temporary destination. It is still a little bigger than what we would like in the living room, but right now it is perfect to hold cars, cars, cars, and balls. And I kept the style pretty neutral so that it can move around in our house as needed. Here is how it looks in our living room:

And here is how much storage space it offers:

But let’s rewind. At first I was considering painting it since I already had all supplies on hand and the makeover would have had a cost of zero bucks. So I removed all the extra trim and put my birthday present (a sander) to work to remove some very old lacquer. But then I realized that the wood was pretty dinged and dented and would need to be sanded down to almost nothing if I wanted it to look smooth. An even coat of paint would have highlighted all the dents even more. On top of that the living room is a pretty heavily used place for rough playing and we don’t want our son to hit his precious head harder or more often than he already does. Here is how the trunk looked without trim. Later in the game it also lost its flimsy legs.

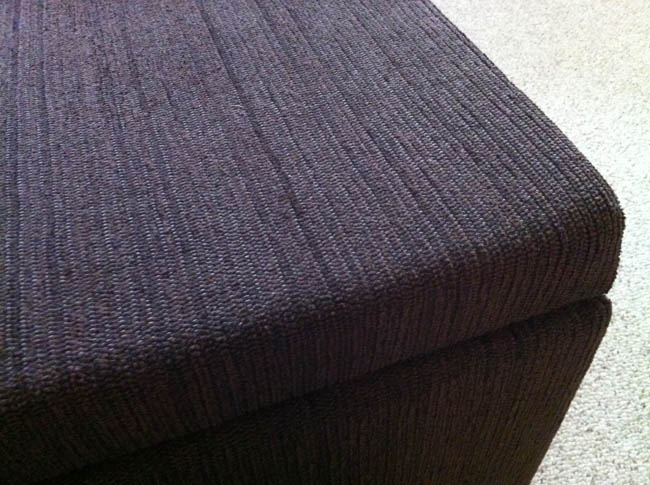
That’s how I ended up going down the upholstering road. And that’s when I understood why ottomans are so freaking expensive. It’s because foam is freaking expensive! Just the piece on top would have been $30 if I hadn’t had a 50% off coupon. Luckily Joann is pretty generous with their coupons and the thicker home decor fabric that is usually pricey as well was marked down to $6 a yard. So all in all I spent $10 on the trunk and $40 on foam and fabric and just managed to stay within my self opposed limit of $50 for a storage ottoman. Look at this pretty corduroyish rough but soft fabric:
I had the top piece of foam (2 inches) cut to size at Joanns and the thinner side side pieces (half inch) were easily cut with a sharp steak knife. Then I glued the foam to the wooden trunk with caulk and got so excited that I forgot to take a picture of this stage.
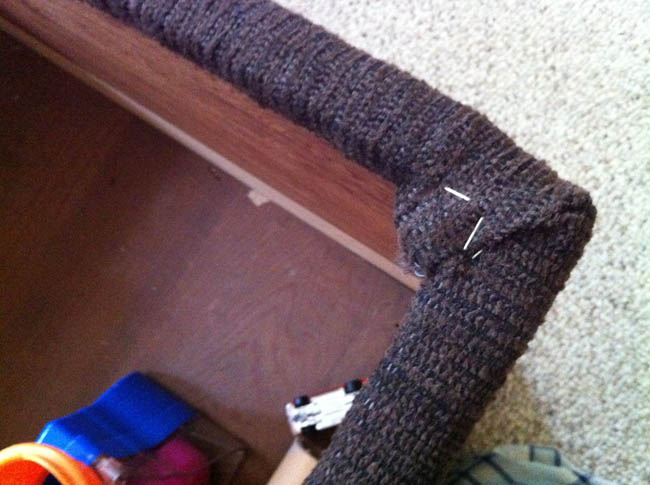
Next step was to cut the fabric to size and sew some simple seams as described here for my other ottoman makeover. Pulling it over the ottoman and stapling took about two hours because this guy needed a lot of staples. A lot!! See here how I tucked in the rough edges, got the corners done, and tried to make it all even. As for the hinges, I just took them off before and then screwed them back into the same places on top of the fabric. Works just fine.

To finish it off completely I am hoping to add some dark tapered square bun legs underneath at some point in the future. Those legs are $8 a piece at the hardware store, so it will have to get done on another month’s budget.

In the meantime Milo is happy that he can reach into the thing perfectly to pick up some cars and let them roll down the lid back into the trunk.

And mama is happy that at the end of the day she can just make the mess disappear and enjoy a clean living room. Life is good.
November 10, 2011
Pinterest Craft Night Part 2
Winter Wreath Tutorial:
- Buy any wreath base (straw or foam) at a craft store with a 50% off coupon.
- Use an old knit sweater or scarf or buy one at a thrift store for less than $5.
- Buy a cheesy piece of Christmas decoration at the Dollar Store.
- Cut the sleeves off the sweater and cut them open on one side so that you have flat pieces of knit fabric. If you need more, cut up the body as well.
- Wrap the fabric around the wreath and hot glue it to the back.
- Cut up some smaller bands and glue them around the seams and some other random spots.
- Hot glue the decorative trees or whatever else you found at the dollar store on the bottom of the wreath.
- Use a burlap ribbon to hang it on the door.
November 9, 2011
Work At Home
While the dining room was happily being made over a few weeks ago, I couldn’t but notice how my desk nook on the opposite side felt a little left out. When we moved in I found that this unusable corner would make a perfect area for working at home, getting paperwork done and bills paid. The small desk that I once bought at a yard sale for $10, sanded down, re-stained, sealed, and re-hardwared (of course completely undocumented at that time) fit in nicely and that was it.

The drawers started to overflow, bags and power cords tended to accumulate next to it and it just didn’t feel cozy enough to really get some hard work done. Something had to change. So here is a tiny little mini-makeover for ya:
The desk top is being protected by a dining room matching pillow case.

The mini lamp is borrowed from the guest bedroom for as long as we don’t have any guests.
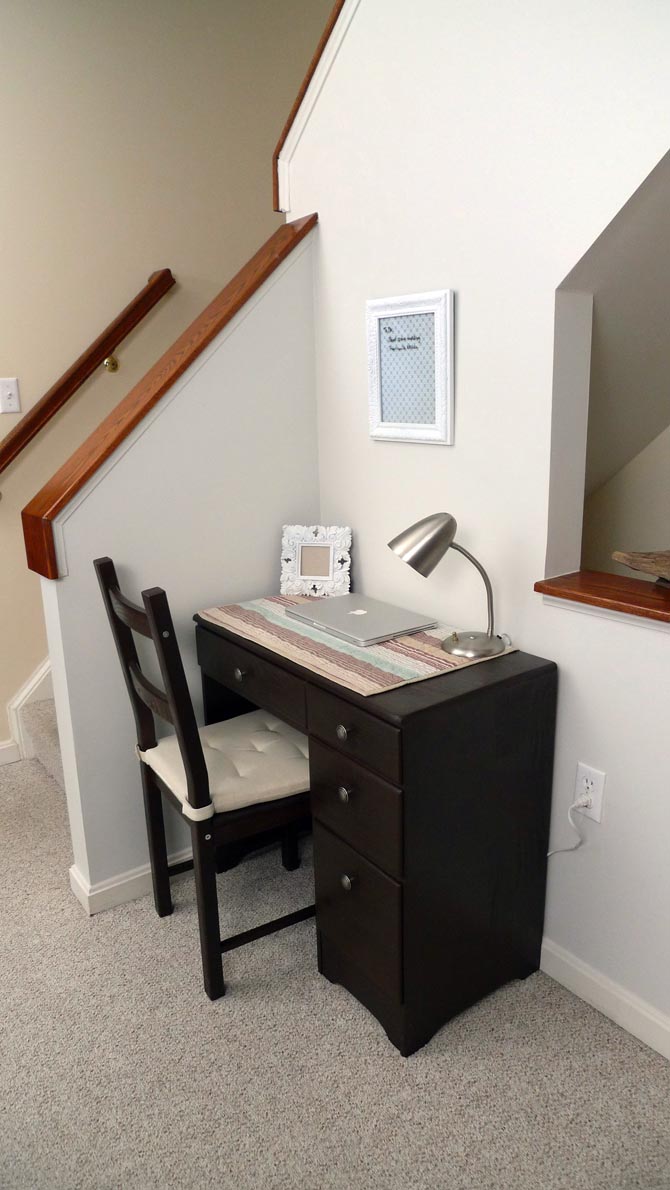
The two white frames were side-products of the spray painted chandelier and one of them is now serving as a not-so-white white board. Just put some nice paper behind the glass and use dry-erase marker on it. Much prettier than plain white.

In reality this desk is more a disguised storage unit than a desk. In case you were wondering what I am hiding in there:

What is still missing is a small storage ottoman to house some overflow that doesn’t fit into the desk anymore. They have basic ones at Walmart on sale for $11 that could easily be upholstered with a different fabric. Stuff like paint chips, Ikea catalog, and screw drivers (there is just no point carrying them back down to the tool bench all the time with the rate of projects going on here these days) need a new home urgently. And yes, those oaky handrails and the shelf in the wall cut-out will be the victim of my white trim paint at some point. Sooner or later I’ll get you all, you rustic oak .. har, har!